I was recently asked to compile ten of my favorite tips and techniques from Light & Exposure for Digital Photographers. Here’s a look at what I selected, along with the photos from the book that are used to illustrate each technique or tip and page references to text that explains the technique more thoroughly.
Briefly noted: these are not hardware tips (like what memory card to buy), these are photographic ideas that will help you stretch your technique and help you create the photos you can see in your mind’s eye.
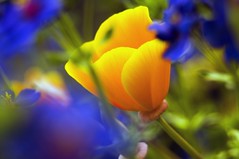
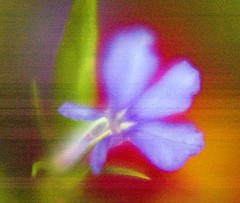
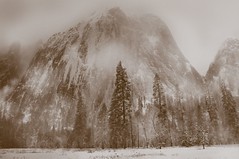
| 1. Choose a wide-open aperture for low depth of field. | |
|
Sometimes a photo that is completely sharp is neither possible nor desirable. To create a partial blur effect in windy conditions place your camera on a tripod.
Using aperture-preferred metering or manual exposure control, choose a wide-open aperture such as f/4.0. The resulting low depth of field, possibly combined with motion blur, will create a pleasing effect. (Pages 50-55.) |
 |
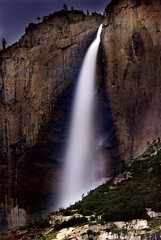
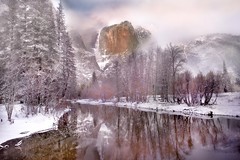
| 2. Use a slow shutter speed to blur the motion of water. | |
|
Moving water is rendered differently depending upon the shutter speed you use in your exposure. Setting the shutter actually sets how long the shutter will be open, not a speed.
Fast shutter speeds capture moving water crisply, and slow shutter speeds show water in motion as a blur. To create a very pleasing diffuse blur effect with quickly moving water, try a very long exposure time, for example, about three minutes. (Pages 92-94.) |
|
| 3. Boost the IS0 to use noise creatively. | |
|
Photographers usually think of noise as something bad that should be aoided using proper exposure settings and post-processing remove it. But noise can actually be used creatively. For example, one way to create a “pointillist” effect in your photos is to boost your ISO and then shoot straight into a strong light source. (Pages 112-113) |
 |
| 4. Don’t worry about white balance. | |
| Many photographers spend much too much time worrying about their in-camera white balance settings. If you are shooting in RAW, the only thing this setting really does is control the way your photo is displayed in the camera LCD. So leave your camera set to auto white balance, concentrate on the photography not the white balance setting, and correct your white balance when you post-process your photo. (Pages 126-132) | 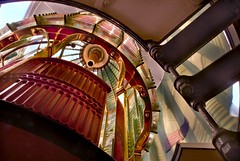 |
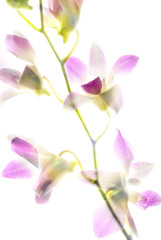
| 5. Use a light box and overexposure to create a transparent effect. | |
|
To create the effect of transparency, try an inexpensive light box as your light source. Use the kind of light box that is used for viewing slides or other transparencies. Place the lightbox either under or behind the object you are photographing. This is an excellent technique for flowers and other semi-transparent objects. If you overexpose photos like this, you can bring out luminous and transparent details. (Pages 136-137) |
|
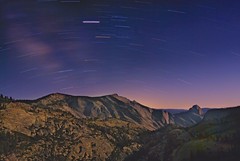
| 6. To get your exposure right at night, try a test exposure at a high ISO. | |
|
If you want to capture star trails at night, you need to make a long exposure, which means using a low ISO. Before investing the time it takes to create this effect, test your exposure at a higher ISO and a faster shutter speed, then do the math to make sure your longer exposure is correct. (Pages 28-29 and 140-143) |
 |
| 7. Create a studio of your own. | |
|
You can create a home studio of your own using surprisingly inexpensive materials. Desktop lamps can be used for flood lighting, and LED headlamps can be used for spot lighting. Venetian blinds can control the direction of light, and sheets can be rigged to work as diffusers. A good art supply store is also a great source of inexpensive supplies that can be used to make a creative home studio. (Pages 146-149) |
 |
| 8. Use the RAW data in a photo to extend the dynamic range of your images. | |
|
You may not be aware just how much exposure latitude there is within a single digital RAW capture. By combining multiple conversions from the same RAW capture using the Adobe RAW converter, you can create a final photo that has brighter light areas and darker dark areas than you would ever have thought possible. (Pages 164-165) |
 |
| 9. Transform your photos to black and white using color information in the photo. | |
|
It’s easy to convert a color image in Photoshop to grayscale by simply dropping the color information in the photo. But this doesn’t get you great black and white images with exposure and contrast subtleties. To create rich black and white transformations, you need to work with the color information in the color photo before you drop the color information. (Pages 172-175) |
 |
| 10. Get your camera off automatic. | |
|
When you use auto exposure, you are letting your camera make the important decisions about the exposure of your photos. Take back control! Getting your camera off automatic means learning to really understand exposures. Furthermore, once you know how to set manual exposures you may find that your exposure settings are better and more creative than those the camera would have picked. By using manual exposure, you’ll also find out when it is appropriate to use an automatic or semi-automatic exposure mode. |
|