What is selective LAB sharpening?
LAB sharpening means working in the LAB color space with the L-channel selected. This only sharpens black and white information, and leaves the color pixels alone. Any sharpening tool can be used, but I recommend the Unsharp Mask filter (found in Photoshop via Filter > Sharpen > Unsharp Mask).
You can choose which areas to sharpen by using this technique on a duplicate layer in LAB, masking the layer, and painting in the areas you want to selectively sharpen.
So LAB Sharpening when used on a duplicate layer that is associated with a layer mask is what I mean by “selective LAB sharpening.”
What are the benefits of selective LAB sharpening?
Selectively sharpening in LAB gives you a double benefit: first, the color pixels aren’t sharpened, and color data is usually where unattractive oversharpening is most noticeable. Second, by “painting in” the L-channel sharpening on a layer mask, you can selectively pinpoint the areas you want to sharpen, drawer the attention of a viewer to portions of the image you want to emphasize, such as the eyes in a portrait. Interestingly, the viewer is often unaware that this is happening.
Generally, moderate sharpening of the lines in the L-channel using a tool like the Unsharp Mask creates a pleasing effect that is both sharper and “mellow.”
When do I use selective LAB sharpening?
You should use selective LAB sharpening towards the end of a creative workflow. This is generally my final step before creating a master file to archive. The master file is then used to create individual files for specific purposes, such as printing or to create a JPEG for display on the web.
What are the kinds of sharpening from a workflow perspective?
If you are working with a RAW file, it is generally moderately sharpened as part of the conversion accomplished by programs such as Adobe Camera RAW or Lightroom.
Output sharpening is intended for specific output devices, such as when you are making a large print, or when a particular publication specified an amount and mode of sharpening.
Selective sharpening as used in this FAQ falls between input and output sharpening in terms of its place in a workflow, and is intended for aesthetic effect: to improve the visuals of an image without the need to address defects or technical issues.
What is LAB color, and how is it implemented in Photoshop?
LAB color is a color “space,” or model, specified by an international body of scientists (the CIE). It is a color space in the sense that RGB is a color space (used on monitors and on the internet), and CMYK is another color space (used in offset printing).
As opposed to RGB and CMYK, LAB is largely theoretical, meaning that you can work in LAB in Photoshop, but to do anything (such as displaying or printing it) you need to first convert the LAB file back to RGB (or CMYK).
LAB consists of three channels: L, A and B. The L-channel contains black and white information, sometimes also referred to as “luminance” information, or “grayscale.” The A-channel is used for Green and Magenta, and the B-channel is used for Yellow and Blue.
What are the benefits of LAB color?
The primary benefits of LAB are:
- It is the widest gamut color space of them all
- Black and white information can easily be processed separately from color information, since the black and white information is contained in a discrete channel
- The channels in LAB are “color opponent”
What does “color opponent” mean?
“Color opponent” means that each channel contains a color and its opposite, for example one end of the L channel is white, and the opposite end is black. This makes it easy to do powerful color manipulations and adjustments in LAB.
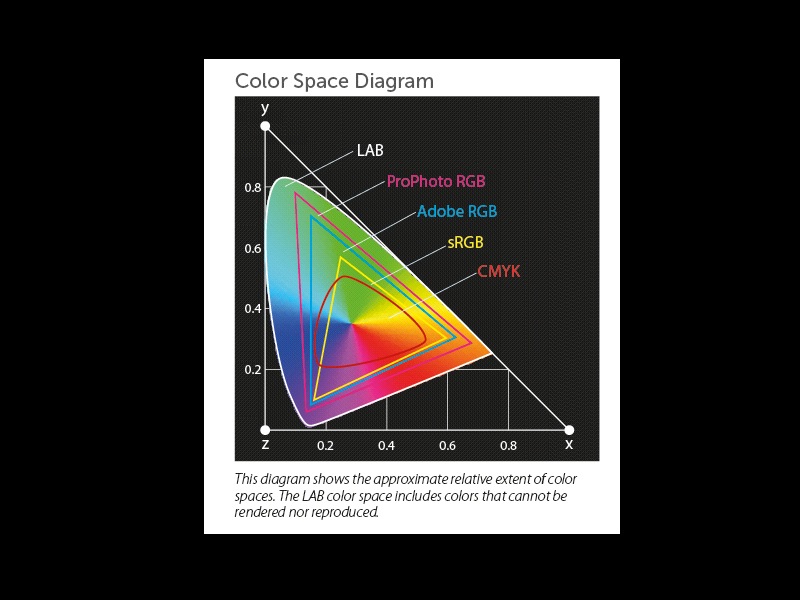
How does the gamut of LAB compare to that of other spaces, and what the **!!??*** is a “gamut” anyway?
Color “gamut” refers to how many colors can be reproduced using a given color space. The wider the color gamut, the more potential colors. LAB has the widest gamut of any color space (see diagram comparing color gamuts below), and is even capable of specifying colors that the human eye cannot perceive, and cannot be reproduced.
How do I convert to LAB color in Photoshop?
The first time you convert an image to LAB color in Photoshop choose Edit > Convert to Profile. In the Convert to Profile window, choose LAB Color from the Destination Space Profile drop-down list. In the Conversion Options box, make sure that Adobe (ACE) is selected as the Engine, and that Intent is set to Relative Colormetric.
Check the Use Black Point Compensation box, and click OK.
Note that on subsequent conversions, you can use Image > Mode > Lab Color as a shortcut. The settings you entered in the Convert to Profile window will be used by default.
Can I convert a document with layers between color spaces?
Did you ever have a grade school teacher who said, “You can but you may not”? I did. This is one of those you can but you may not situations. Photoshop won’t stop you from converting documents with multiple layers from one color space to another—it may send up a warning noting that it is unwise—but the results can be unpredictable. It’s a better practice to flatten documents, archiving as necessary, before converting from one color space (such as LAB) to another (such as RGB).
Why do you suggest sharpening on a duplicate layer?
Sharpening on a duplicate layer allows you to add a layer mask to the sharpened layer, and paint in only specific areas of the image you want sharpened.
What tools should I use to paint in the sharpened area on the layer mask?
The most commonly used tools for painting on a layer mask in Photoshop are the Brush Tool and the Gradient Tool.
Which channel should I sharpen in LAB, and how do I know that only that channel is selected?
Open the Channels palette (Windows > Channels) and make sure that only the L-Channel is selected.
But don’t I want to see the impact of sharpening on the entire image, not just on a single channel?
It’s a good idea to see the impact of sharpening on all channels, not just the L-Channel, even if the L-Channel is the only channel selected. To do this, with only the L-Channel selected in the Channels palette, use the Eye tool in the left hand column of the Channels palette to make all three channels visible. It’s important to understand that a channel can be visible without being active.
How does the Unsharp Mask filter work?
The principle of the Unsharp Mask is based on a technique used prior to the digital era in which a blurred copy was contact printed with the original negative, cancelling out some of the blurring, and increasing the contrast in lines in the image (and therefore making it seem sharper).
Note that the Unsharp Mask filter is not always the best tool for general sharpening. It works best on black and white information. Specifically, it is highly recommended for sharpening the L-Channel of a file that has been converted to LAB.
What settings should I start with for the Unsharp Mask filter?
The Unsharp Mask in Photoshop has three settings: Threshold, Radius and Amount (you should tackle them in this order).
Threshold goes from 0 to 255, and represents how far two pixels need to be from each other for sharpening to be applied. The lower the number, the more the sharpening. Generally, settings between 0 and 20 are used. For sharpening the L-Channel, I suggest a starting Threshold setting of 9.
Radius controls the width of the lines used for sharpening. You want these lines to be as wide as possible without intruding themselves on the viewer. I recommend a starting Radius setting for the L-Channel of 4.2 pixels.
With Amount, first set the Threshold and Radius, and then play with the Amount slider. Generally, an Amount between 50% and 100% will work well for selective LAB sharpening, producing a noticeable effect without overdoing it.
Note that these suggested settings are only for L-Channel sharpening in the LAB color space. For more general used of the Unsharp Mask you would probably want to raise the Threshold to around 15, and lower the Radius to between 0.2 and 2 pixels.
What can I do if I’ve oversharpened my duplicate layer?
Simply take down the overall opacity of the duplicate layer that was used for sharpening. By the way, to see the impact of sharpening it is a good idea to inspect an image at a variety of magnifications, from extremely magnified to quite small. You want to make sure that it looks good across the spectrum of possible magnifications.
Where can I go for further information?
A number of my books cover Selective Sharpening in LAB Color in detail (along with information about other aspects of working with LAB). You’ll find this in The Way of the Digital Photographer, The Photoshop Darkroom pages 151-203 and Creative Landscapes, pages 222-223.
I’ve also recorded a webinar specifically about Selective Sharpening in LAB Color in which I work through a number of actual case studies. Click here for more information, and here to purchase access to the webinar recording.