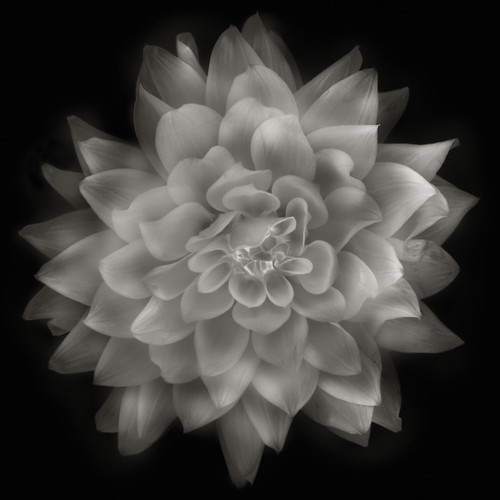
White Dahlia, photo by Harold Davis. View this image larger.
I wasn’t planning to photograph any more flowers yesterday. Between kids and work things had been hectic indeed. But when I saw the white Dahlia in a bucket outside a florist, I knew I had to possess its soul. Otherwise known as, photograph the flower.
This particular white Dahlia was not perfect. In the sense that it had obvious flaws. But I could deal with these. The flower had a lavish, wild, partially symmetric sensousness that called out to me.
I bought the stem for $2.50 from the florist, and I wouldn’t let him doll it up with the kind of ugly decorative grass that florists tend to use across all varieties of flora. Putting lipstick on a pig is an act of futility. It also hurts to diminish something of pure beauty by adding unbecoming and unnecessary decoration.
I cut the flower off the stem. Oh, how we hurt the ones we love! Next, I photographed straight down on a light box.
For this image I made a total of six exposures using my 85mm macro, all at an adjusted aperture of f/64 and ISO 100. Exposure times ranged from 2 seconds to 30 seconds. The exposures all were “over exposed” by the histogram, and tended towards the high-key on a white background.
I combined the captures in Adobe Photoshop CS4 using layers and masks. The inital RAW conversion included 10 layers.
After “smooshing” the layers down (now, there’s a technical term for you!), I converted to the LAB color space. I duplicated the image, and used an inversion of the L channel to create a black background. Then I copied the original image over the L-inverted copy at varying transparencies. This helped to create a soft, semi-transparent effect in the petals.
I could see this was an essentially black & white image, so I decided to formally convert to black & white. I used my favorite technique of duplicating the background, using a CS4 b&w adjustment layer, selectively painting in areas, and repeating the process with different b&w adjustment layer settings.
The image seemed to need something more, so I duplicated a flattened version, and put it through Nik Software’s Silver Efex Pro. The Silver Efex “Complex Structure” mode added what I was looking for, and I selectively painted areas back over the adjustment layer version using this effect.
The final addition of sepia toning at low opacity was accomplished both in Photoshop and using one of the Silver Efex sepia toning effects.
Oh yeah, full disclosure: According to the F.T.C. regulations that take effect December 1, I should note that I am using Nik’s Silver Efex Pro as a freebie professional courtesy. While I’m at it, I might as well note that I am using Photoshop CS4 for free thanks to Adobe Software.
Pingback: Ghost Flower | Photoblog 2.0
Pingback: Dahlia in Decay | Photoblog 2.0