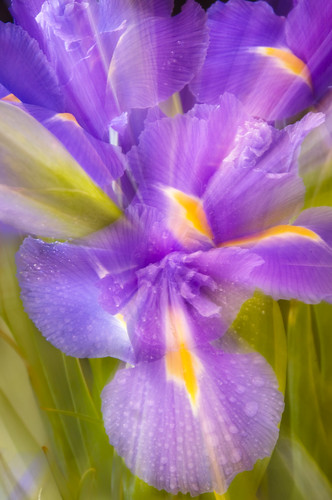
Iris and Motion, photo by Harold Davis. View this image larger.
I like to work with my photography setups, equipment, and Photoshop in a what-if state of mind.
When I’m in a what-if state of mind, I don’t care what the documentation says, or what some Photoshop guru says to do. I want to see what happens if…I try this, or that, or something totally new. Wild and crazy is, of course, my hope.
Some of my best images have come when I’m in a what-if state of mind.
A fringe benefit: experimenting with “what if” develops the muscles I need to problem-solve when a client asks me to make specific images, often based on something I’ve already created, but a bit different. It’s important if you hope to use “what if” experimentation for this purpose to keep good records of what you’ve done so you can reproduce it.
This image started with a “what if”: What if I put a bunch of Iris flowers in a totally dark room, open the shutter long enough to get full depth of field at ISO 100, and “paint” the buds of the flowers in with a flash light?
I ran into all kinds of problems with this scheme. It was hard to accurately track the duration of the light painting, so therefore hard to be consistent with exposures. I ended up shooting 15 minute exposures, painting for about a minute, in some of them climbing up Nicky’s bunk bed and clamping the camera on to get a nice bird’s eye view down on the flowers.
The kicker is that I could tell even from the LCD that these photos just didn’t work. So I opened the room-darkening blinds. With the camera still on the tripod, and the flowers sitting on a black background, I zoomed and panned for some mid-length exposures to see what effects I could get.
This technique was partly inspired by some lovely panned images of trees by Robert Eckhardt, who attended my recent night photography workshop. I’ve also been looking at Bryan Peterson’s Understanding Shutter Speed, which is a great idea book for images along these lines (but please don’t rely on the Peterson book for accurate general information about digital photography concepts such as noise and ISO).
A technical note: If you look at the exposure information for this photo, you’ll see I used a circular polarizer. The point of the polarizer was primarily to make my exposure longer (so I had more time to play with the pan and zoom), and also to help saturate the colors.
[Nikon D300, 18-200mm VR zoom lens at focal lengths ranging from 200mm to 70mm (300mm to 105mm in 35mm terms), circular polarizer, 10 seconds at f/32 (comprised of 2 seconds at 200mm, 5 seconds zooming from 200mm to 70mm, and 3 seconds panning up and down on tripod at 70mm) and ISO 100, tripod mounted.]
Pingback: Photoblog 2.0: » Photoblog 2.0 Archive: » Event Horizon