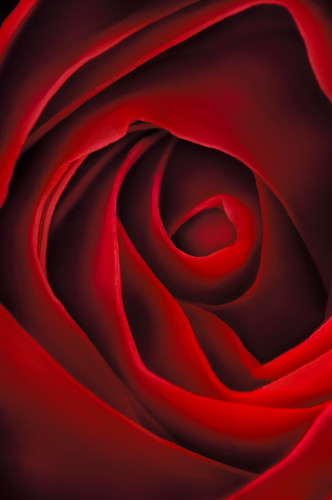
Kiss from a Rose, photo by Harold Davis. View this image larger.
The lighting, photography, and post-processing of this image all had the same goal: to increase saturation and tonal contrast and create a kind of “Georgia O’Keefe” effect. This is a set of techniques I’ve already used in my Variegated Rose (shown at the top of Photoshop Credo).
Lighting: I positioned the rose (a cut flower) so the light source (in this case the sun) went obliquely across the top of the flower so it created deep shadows. I controlled the shadows by positioning some sticks in front of the flower to selectively deepen the shadows.
Exposure: I used the tripod collar on a telephoto macro to mount the lens on the tripod, and pointed my camera-lens-extension-tube rig straight down on the rose. I used a magnifying eye piece for precision focus.
I combined three versions exposed at different shutter speeds to create the version shown, but all the versions were biased towards underexposure.
Exposure data: Nikon D300, 200mm f/4 macro lens, 24mm extension tube, 3 combined exposures at 1/2 second, 1 second and 2 seconds, each exposure at f/36 and ISO 100, tripod mounted.
Post-Processing: As noted, I started by combining three captures using layers and masking to increase the tonal range of the composition. After collapsing the composite, I cleaned it up—it’s amazing how little “gribblies” tend to show up in extreme macros.
Next, I combined the background rose layer with itself twice, using Multiply and Screen Blending modes—once again with the idea of increasing contrast and tonal range. Layers and masks controlled the scope of the effect to specific areas.
I used two of the Nik filters from Color Efex Pro in my next pass—Glamour Glow and Tonal Contrast—to further my goals of enhancing both contrast and saturation in a selective and attractive way.
The most important Photoshop move meant converting the image to LAB color, and blending it selectively (using Normal and Soft Light modes) with an Equalization of the AB channels of a duplicate version of the image.
You’ll find more about my flower photography techniques in Creative Close-Ups: Digital Photography Tips & Techniques and more about my post-processing ideas and workflow in The Photoshop Darkroom: Creative Digital Post-Processing.
Needless to say, this level of Photoshop work in a house teeming with kids over Christmas break requires a good set of headphones and some great music—in this case Rosanne Cash’s The List.
Osselin
28 Dec 2009Absolutely perfect! I like it!
Pingback: Stuff You’ll Like | Chuqui 3.0
Pingback: New Harold Davis Photo.Net Column | Photoblog 2.0
Grace
22 Oct 2014Hey, was this painting copied from a piece of work by Georgia O’keeffe or did you make it yourself, also what is the size of this?
Harold Davis
22 Oct 2014@Grace—Obviously I made this, with a nod of the head to O’Keeffe. Prints are available in a variety of sizes! Best wishes – Harold