A reader writes:
I’ve read your piece on photographing the lobelia flower with your lens baby, as well as the item you refer to with more information about this set up, and I still don’t get it. Could you please be a little more explicit?
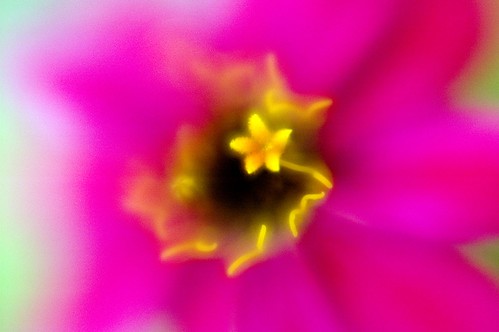
OK. There’s nothing like a straightforward request, and the whole Lens Baby thing is pretty straightforward. But, before I get started, another photo:
You get a Lens Baby from Lensbabies.com. It costs $150 plus shipping for the Lens Baby 2.0, and you need to specify the lens mount (Nikon or Canon and some others). The Canon version provides some exposure automation (I think), but there is absolutely no automation with the Nikon version.
Here’s another photo:
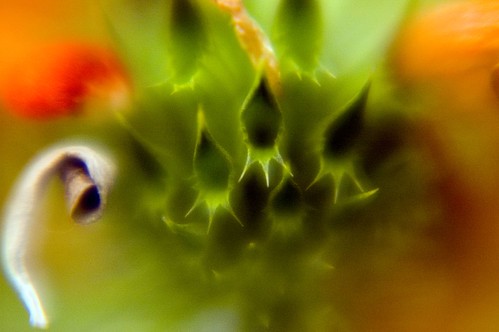
The macro kit for the Lens Baby consists of two glass filters that screw on the end. One is +10 and one is +4 diopters, and you can stack them together to get within 2-3 inches of your subject. These filters will run you another $29 bucks and come with absolutely no documentation. They do arrive in a sweet little carrying pouch that says “Lensbabies” in a kool typeface. (You gotta love this kind of packaging, elevating form far over function, as all of us visual people do from time to time!)
Here’s another lens, baby macro:

The Lens Baby itself has no ability to focus. Essentially, you have a “sweet spot” towards the center of the thing that is more-or-less in focus, and all the rest of the image is sweetly and pleasantly blurred.
The exact location of the sweet spot is impacted by a couple of factors. First, the end of the Lens Baby is flexible and bellows-like, so you can bend it around. This changes both the size and location of the sweet spot (although I’ve found that the way the photo comes out looking does differ from the way I see things through the viewfinder, through-the-lens viewing or not). In other words, chance and its guardian angel Sarah Dipity (serendipity) play a role with Lens Baby photos.
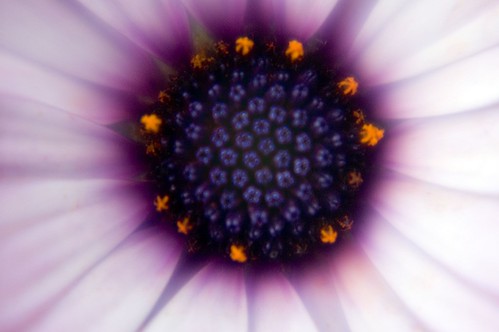
Here’s another photo:

The other factor that influences focus also influences exposure. The Lens Baby 2.0 comes with a bunch of different magnetic rings that you plop into place inside the barrel of the Lens Baby lens. (The Lens Baby comes with a little tool that allows you to easily remove the rings.)
These rings set the aperture of the lens. The smaller the opening in the magnetic ring, the smaller the aperture, and–to some extent–the greater the apparent sharpness of the Lens Baby due to higher depth of field.
At best, how sharp are we? Not very. That’s not the point of the Lens Baby:

As a practical matter, once you have the macro filters in place, particularly if you are using both of them, you probably don’t want to be bothered with changing the aperture rings (you’d have to take the macro filters off to change the aperture ring). I find myself using the Lens Baby “wide open” with no aperture ring, since it’s not the point of the thing to be sharp, and with the widest aperture you are most likely to get acceptable results hand holding in the part of the image that is sharp (because the wider the effective aperture, the faster the shutter speed you can use).

So, all the photos that accompany this story were taken with my Nikon D70 mounted with the Lens Baby, no aperture ring, and both +4 and +10 macro filters. There’s no focusing, and no exposure automation.
What you have to do is set the camera to manual (M on the dial for those of you who are acronym tone-deaf). The only control you have over exposure is setting the shutter speed.

The photos that accompany this story were taken at shutter speeds between 1/60 and 1/200 of a second in overcast, but bright, conditions. But trial and error is required. You’ll also need to review the results on your LCD display as you take the photos, and give praise for the bracketing inherent in the Raw format.
Having set the shutter speed where I guestimate it ought to be, the process of taking one of these photos is pretty intuitive: I get close, wiggle the Lens Baby, and when I like what I think I see, press the shutter release.
|
|
|
morph22
29 Nov 2005I recently got a Lensbaby 2.0 for my Canon 20D. So far I’ve loved it, but the possibilities with the macro adapter rings that you’ve illustrated here make me really excited. These photos are just beautiful.
You are correct about the Canon allowing it to function in Av mode as it will set the exposure time based on the amount of light entering the lens.
Pingback: Photoblog 2.0: » Photoblog 2.0 Archive: » Solo Water Drop
Pingback: Photoblog 2.0: » Photoblog 2.0 Archive: » Digital Noir
Pingback: Photoblog 2.0: » Photoblog 2.0 Archive: » Wet Rose
Pingback: Photoblog 2.0: » Photoblog 2.0 Archive: » Shell Game
Pingback: Photoblog 2.0: » Photoblog 2.0 Archive: » Wings
Pingback: Photoblog 2.0: » Photoblog 2.0 Archive: » Bulbs de Noel
Pingback: Photoblog 2.0: » Photoblog 2.0 Archive: » Compare and Contrast
Pingback: Photoblog 2.0: » Photoblog 2.0 Archive: » Orchid Angel
Pingback: Lens Baby : un objectif flexible pour choisir la zone de nettet� - VirusPhoto
Pingback: Photoblog 2.0: » Photoblog 2.0 Archive: » Will You Be My Lensbaby?