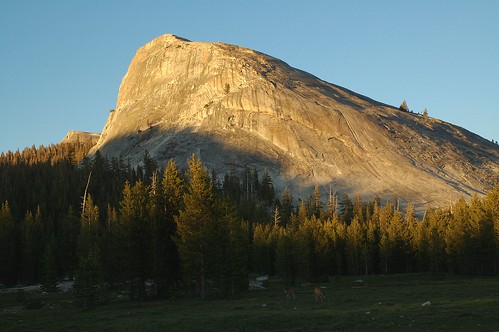
Lembert Dome, Tuolumne Meadows by Harold Davis
I always have a little chuckle when I hear a photographer boast that their digital photo didn’t need to be “fixed” in a digital darkroom program such as Photoshop or Photoshop Elements. This statement probably means that the photographer doesn’t understand what their digital camera is capable of doing, and that they shot the original photo as a JPEG rather than in camera RAW format. There’s nothing wrong in shooting JPEGs, but you lose a lot of the power of digital photography. You can certainly fix things in Photoshop if you start out with a JPEG, but you don’t process an image as a matter of course with a JPEG the way you do with a camera RAW image. (By the way, you can set many cameras to save images in both JPEG and camera RAW formats, so you have the best of both worlds.)
The steps I take to process a camera RAW digital photo in Photoshop are very comparable in their results and purpose to the steps I would have taken to make a good silver halide or chromagenic print from a film original. Here are my steps for routinely processing a digital RAW photo:
- Open the camera RAW image in Photoshop. Note that there is no universal camera RAW format, each camera manufacturer has a proprietary version. For example, Nikon’s camera RAW format is saved with a NEF file suffix.
-
The Raw Adjustments dialog will open as part of Photoshop’s process of opening the camera RAW image. Here’s where part of the power of the RAW format comes in. This dialog, shown here, let’s you adjust the exposure up or down a few stops – so shooting in camera RAW is effectively the same thing as automatically bracketing each exposure.
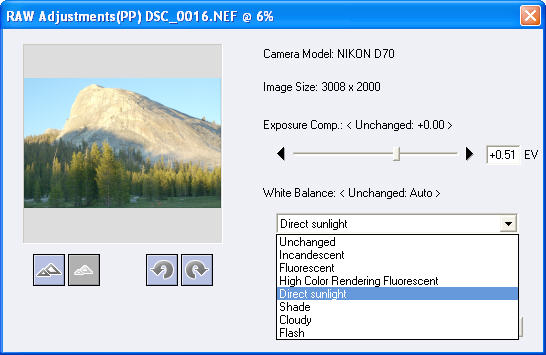
The other thing this adjustment dialog does is let you set the kind of light source used in the image. This is the same things as resetting the white balance – after the fact. The possible settings are shown in the drop-down list, and you can preview the results before making a choice (you can also preview the results of changing the exposure up or down). Here’s my post about the Photoshop CS2 Camera RAW Settings dialog, which is what you use to import a RAW photo into CS2
- As soon as the image opens in Photoshop, save it as a PSD file. PSD files are Photoshop’s native format. You can archive the camera RAW orginal (NEF file if it was shot with a Nikon) and keep it safe. Do your Photoshop work in the PSD file, which has the advantage that it keeps track of the history of everything you do within Photoshop. It’s smart to name the PSD file the same way the camera RAW file was named, except the file suffix – that way you know what corrrecting image goes with what camera RAW original.
-
Working on the PSD file, sharpen it by choosing Sharpen > Unsharpen Mask from the Filters menu. A 100% sharpening should be about right, but experiment with the slider to try less or more sharpening, and use the preview checkbox to make sure the effect works before applying it. (Too much sharpening can make an image appear to be coarse and unreak.)
- On the Images menu, choose Adjustments > Auto Levels. If you don’t like the results, use the History palette to undo the adjustment (Control + Z on the keyboard also undoes your last step).
- On the Images menu, choose Adjustments > Auto Contrast. If you don’t like the results, use the History palette to undo the adjustment (Control + Z on the keyboard also undoes your last step).
- On the Images menu, choose Adjustments > Auto Colors. If you don’t like the results, use the History palette to undo the adjustment (Control + Z on the keyboard also undoes your last step).
- Now come some steps that depend on the image and your taste: use the Clone Stamp Tool and Healing Brush to fix and flaws in the image; dodge and burn specific parts of the image to taste to bring out details hidden in shadow (dodging) and put detail back into parts of the image that are washed out (burning). (Dodging works better with digital images, so you are better off exposing properly for the brighter parts of an image and adjusting the shadow areas in Photoshop as a generalization.) You can also adjust hues, saturations, and specific colors.
- When you are satisfied with the image, make sure it is saved in the PSD format.
- Using the PSD file, use Save As to create different format files for different uses – typically a JPEG file for viewing on the Web, and a TIF (tagged image file) format file for print reproduction.
It’s important to regularly follow a process such as this for processing and archiving your digital photos. As I said at the beginning of this protocol, these steps are very analagous to what photographers have always done to create good finished prints – so I don’t see why there should be any obliquy attached. The only excuse is ignorance – and if you are reading this, you are no longer ignorant.
You may also want to try photo retouching or photo composition (neither of which are described here – well, maybe a little retouching depending how far you go with the Clone Stamp Tool). These are great things to do with digital photos and Photoshop. But photo composition is worrisome – because a skilled Photoshop operator can change anything digital – photos and documents – and there’s no way to tell that changes have been made! Beware – you should not necessarily believe your eyes when presented with photos or digital documents. It is easy to fake them nowadays.
Of course photo composition can also be used for artistic purposes. For example, here’s information about photo compositing a moon into your landscape picture.
Pingback: Photoblog 2.0: » Photoblog 2.0 Archive: » Would Ansel Like Digital?
Pingback: Adam Fields (weblog)
Pingback: jarkolicious » probes » links for 2005-07-12
Pingback: Photoblog 2.0: » Photoblog 2.0 Archive: » Without My Polarizer I am Blue
Pingback: Holy Shmoly! :: Processing a Digital Photo
Pingback: Photoblog 2.0: » Photoblog 2.0 Archive: » Opening Camera RAW in Photoshop cs2
Pingback: Photoblog 2.0: » Photoblog 2.0 Archive: » Processing a Digital Photo
Pingback: StreetRes » Blog Archive » Photography: Photoshop Tutorial
Pingback: Photoblog 2.0: » Photoblog 2.0 Archive: » Aye of the Crystal
Pingback: Photoblog 2.0: » Photoblog 2.0 Archive: » Processing a Photo for Flickr
Pingback: Photoblog 2.0: » Photoblog 2.0 Archive: » Should I buy a Canon or a Nikon?
Pingback: Photoblog 2.0: » Photoblog 2.0 Archive: » Digital Photography Cyborg
Pingback: Photoblog 2.0: » Photoblog 2.0 Archive: » The World in a Marble
Pingback: James Stephens
Pingback: Photoblog 2.0: » Photoblog 2.0 Archive: » Dragonfly
Pingback: Use Levels To Fix Your Poorly Exposed Photos | Lifehacker Australia
Pingback: Photoshop and Digital Photography Techniques