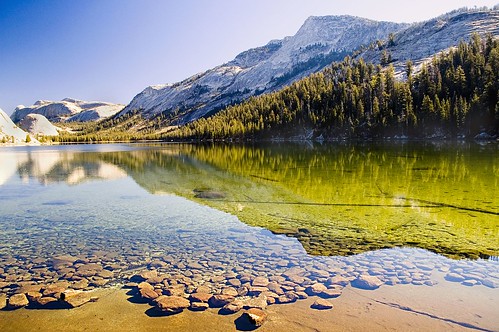
On my trip, I left Yosemite Valley and drove across Tioga Pass. (I’ll write more about this segment of my journey in another blog entry.)
I stopped at the west end of Lake Tenaya for a little down time in the sun (would you believe I was going to read a copy of the New York Times I had picked up in the Valley?) and encountered the wonderful reflection, enhanced a bit with my polarizer.
I’ve been asked a number of times rcently how I process my photos before I upload them to flickr. So I thought I’d write about what I do.
It takes me roughly an hour an image. Often, this is more time than it took to take the photo — more evidence to me that digital photography is a cyborg, one part photographer and one part computer.
There’s nothing that says that you have to do anything so elaborate. For the most part, a Jpeg image straight from your camera will look OK. (But you should know that the Jpeg format automatically sharpens and adjusts the color and contrast balance of images — something that a good human operator can probably do better.)
Here’s how I processed this image (and most of my photos) for display on flickr. (As you may know, I use flickr as the image management software behind this photoblog.)
First, I have my camera set to capture all photos in RAW and Jpeg formats. The RAW version — which is unoptimized but provides all the information from the original capture — is what I’ll use, because I do a better job of finishing a photo than the Jpeg algorithm.
But it is useful to have an initial Jpeg capture because this will tell you (at least most of the time) what the finished image will look like a little better than the RAW version.
I use Adobe Bridge software to scan images to see what came out well enough to bother with. As I said, mostly the Jpeg version gives one a better quick impression of a photo than the RAW version.
You can use the Bridge to tag (and later on filter) photos for quality as a kind of sorting system, but I usually don’t bother with this. Instead, I jot down on a pad of paper the images I am interested in working with further.
Once I’ve settled on an image for further work, I open it in Adobe Photoshop. (Note: I use Photoshop, but for everything I describe in this entry you could use the far less expensive Photoshop Elements with almost exactly the same effect.)
When you open the RAW image in Photoshop (or Photoshop Elements), you can make many adjustments. (See my earlier entry for more information about opening RAW images in Photoshop CS2, and a related piece about processing digital photos.)
Generally, and this is based on my personal preferences, I tend to make the color in my photos more dramatic before I open them by upping the color temperature, tint, and saturation.
I also go for a more dramatic effect by upping shadows and contrast, and compensate by also upping brightness and the exposure.
But all photo conversion effects when converting the RAW image need to be monitored sensitively. It is easy to go too far.
It’s useful to know that once you get the RAW conversion right for one photo in a set (taken in the same light conditions), you can use the same settings for the rest of the photos — by telling Photoshop to use the previous conversion rather than the camera defaults, or by selecting a previously converted image to use as the model for the conversion.
Once the converted image opens in Photoshop, the first thing you want to do is save it off as a PSD file (Photoshop’s native format). You want to be sure to do this so that the original file is never touched by your manipulations.
Next, if the image is to be cropped, use the Photoshop Crop Tool to crop it.
The next step is to adjust the image levels by choosing Image > Adjustments > Levels. The idea here is to manually adjust the histograms represnting the R, G, and B levels to eliminate color outliers that either show spikes in the given primary color, or do not show any color at all. Here’s the Red level pushed in to eliminate the spikes at both ends (you’d also push the ends in if no color at all were shown at the ends):
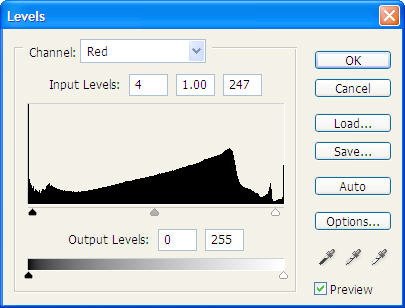
You need to be a little careful with this. If adjusting the level for a given RGB primary color makes the image less pleasing, then you should also tweak the color using the slider shown in the center of the Levels dialog.
Once I’m satisified with my manual adjustment of levels, I generally put the image through Image > Adjustments > Auto Levels. If I’ve down everything right, this doesn’t have too much impact, but does kind of smooth things out. I also try Image > Adjustments > Auto Contrast and Image > Adjustments > Auto Color to see what they do. But be careful: more often than not Auto Color produces a lousy effect, and I have to undo it.
Next, I work on detail areas of the photo (if there are any). This usually means removing imperfections and artifacts with the Clone Stamp Tool and/or slightly adjusting the color in specific selected image areas using the Selective Color dialog (Image > Adjustments > Selective Color).
The photo is now almost there, but needs to be sharpened. To do this, first I apply the Unsharp Mask (Filters > Sharpen > Unsharp Mask). I sharpen it somewhere between 50% and 70% with the radius set low (between 1 and 2 pixels). Then I use the Smart Sharpen filter (Filters > Sharpen > Smart Sharpen), shown here:
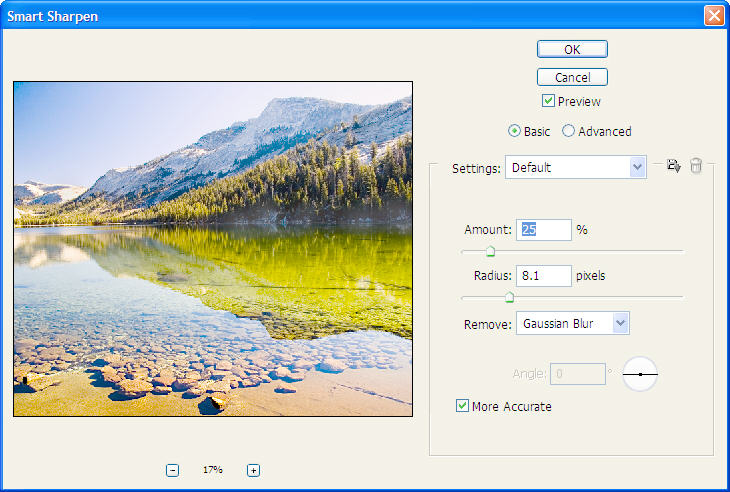
I don’t use Smart Sharpen at a high percentage – no more than 30%. And I watch the impact of the radius setting carefully. The higher the number of pixels used in the radius setting, the more apparent sharpness. But setting the radius high — above 5 pixels — actually causes information to be lost, and can lead to a sort of weird fuzzy-but-sharp look. So you need to be careful with this.
When you are happy with it, save the image in its PSD format. It’s now ready to be archived, and you can used the PSD version if you ever want to make a print or reproduce the photo via Photoshop.
To make a version for flickr, save it as a Jpeg using the highest possible resolution.
Next, upload it to flickr. I use the Flickr Uploadr, a bit of software that you download from flickr. But be somewhat warned: this software is officially beta, and sometimes acts like it! It’s nice that you can upload multiple images at the same time with it.
People use flickr for many reasons. For example, my primary use of flickr is for image management. But I’m also happy to be part of the wonderful flickr community. As part of the community, once your photos have been uploaded to flickr, you should tag them, organize them into “Sets,” and add them to flickr Groups to share them with others. Two good flickr groups for this purpose are 1-2-3 and Macro-1-2-3.
Pingback: Photoblog 2.0: » Photoblog 2.0 Archive: » The Hitchhiking Millionaire
Pingback: Photoblog 2.0: » Photoblog 2.0 Archive: » Road Trip Wrap-Up
Pingback: Photoblog 2.0: » Photoblog 2.0 Archive: » Digital Photography Cyborg
Pingback: Photoblog 2.0: » Photoblog 2.0 Archive: » Bloomin’ Bromeliads, Batman
Pingback: Photoblog 2.0: » Photoblog 2.0 Archive: » Portrait of a Flower
Pingback: Photoblog 2.0: » Photoblog 2.0 Archive: » Fish Swirl
Pingback: Photoblog 2.0: » Photoblog 2.0 Archive: » Rose Spiral
Pingback: Photoblog 2.0: » Photoblog 2.0 Archive: » Above Us Only Sky
Pingback: Photoblog 2.0: » Photoblog 2.0 Archive: » Alas for Analog
Pingback: Photoblog 2.0: » Photoblog 2.0 Archive: » Camellia
Pingback: Photoblog 2.0: » Photoblog 2.0 Archive: » Found in the Fun House
Pingback: Photoblog 2.0: » Photoblog 2.0 Archive: » Beauty
Pingback: Photoblog 2.0: » Photoblog 2.0 Archive: » After the Rain
Pingback: Photoblog 2.0: » Photoblog 2.0 Archive: » San Francisco Sunset
Pingback: Photoblog 2.0: » Photoblog 2.0 Archive: » Processing a Photo for ...
Pingback: Photoblog 2.0: » Photoblog 2.0 Archive: » Processing a Photo for ...
Pingback: Photoblog 2.0: » Photoblog 2.0 Archive: » Processing a Photo for ...
Pingback: Photoblog 2.0: » Photoblog 2.0 Archive: » Flickr’s Best of My Best
Pingback: Sektormedia: Brain Ramblings » Blog Archive » Processing a Photo for Flickr