
There’s more to this picture than meets the eye. Put another way, no matter how hard you look at the on-screen version, even in its larger size, you won’t see everything that is in the image. Let me explain the alpha and omega of it.
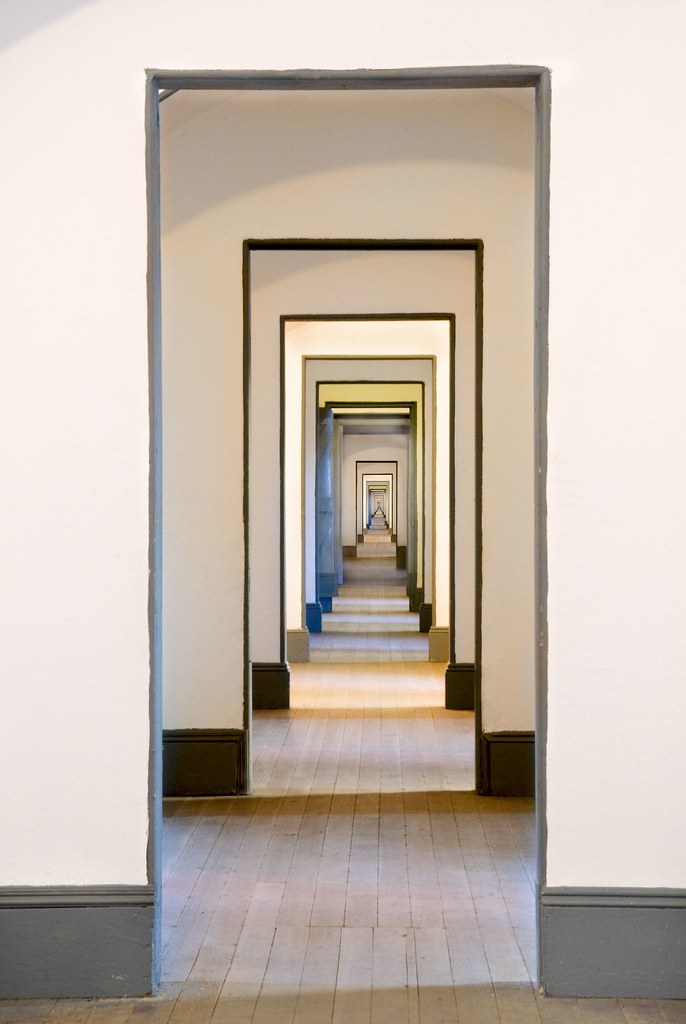
The photo the image is based on started as a time exposure of the corridor in the Officer’s Quarters at Fort Point under the Golden Gate Bridge in San Francisco. (View the EXIF data here.) This was a normally-sized photo taken with my Nikon D200, so at 300 dpi (dots per inch) it measured 2592 X 3872 pixels (about 8.6 X 12.9 inches). I mention the dimensions of the image because they become an issue later in this story.
When I looked at the photo on my computer, I saw six “regressions”–or doorways on the corridor. At the end of the corridor was a dusty, dark, and unattractive display case.
I decided to replace this unattractive display case with a proportionally smaller version of the duplicated image itself, to make the corridor seem to go on longer (for twelve apparent regressions).
It wasn’t very hard to paste a smaller version of the image in, thus extending the corridor to twelve doorways. I duplicated the image, measured the size in the original image I needed, and resized the duplicate accordingly (to about 1/6 of the original dimensions, as it happens). Next, I dragged the small version of the image over the large version to position it in place, and dropped it to add it to a layer in the original image. I used a layer mask, the Paintbrush Tool, and blending modes to combine the smaller version fairly seamlessly into the large version. In addition, I realized that at the point in the process where I flattened the layers I’d need to do a bit more detailed retouching using cloning and related Photoshop tools.
It’s worth noting that as a matter of workflow I had to flatten the layers in my image a number of times. Each time I did this, I saved an archived version of the image with the layers still intact (except, as you’ll see later, when my layered versions exceeded Photoshop’s maximum file size of 2 Gigabytes). I did this archiving at every step of the way where it was possible, just in case I later decide to rework the image, and I won’t note that I did it each time (but you should do it too when you work with layers).
Looking at what I had, the thought occurred to me, why not repeat the process? So I resized the duplicate image once more, down to about 1/6 of the reduced size, or 1/36 of the original size, and added the new, small version in position as a layer to the original image. Once again, I used a layer mask, the Paintbrush Tool, and blending modes to combine the versions, with the understanding that further retouching would be needed eventually.
Now I was up to eighteen regressions, and the corridor with doorways looked pretty infinite to me. But, in fact, the corridor didn’t go on forever. I had to get up pretty close to it, but at 1600% magnification I could see a highly pixelated version of the ugly old display case.
It turns out that 1600% is Photoshop’s maximum magnification, so I couldn’t zoom in any closer. In addition, the corridor-end-within-a-corridor-end-within-a-corridor had shrunk to an area of about 12 X 18 pixels, so the physical limitations of the building blocks of my image seemed to prevent adding any more regressions. For those of you who don’t know from pixels, this is an area smaller than the proverbial pinhead upon with angels dance. As the Wikipedia notes, “A pixel (short for picture element, using the common abbreviation “pix” for “picture”) is a single point in a graphic image.”
Looking at this 12 X 18 pixel canvas at the end of the known world, I figured why not write something on it. True, no one would be able to see what I had written without being able to examine a full-size version of the image in Photoshop or comparable software at high magnification, or perhaps by vliewing a good, large print up close with a magnifying glass. But it seemed worthwhile to embed a secret in the corridors of apparent infinity.
Typography at this small scale proved to be surprisingly difficult, and I had some much appreciated help from Phyllis. I can’t tell you how much it helps my work having a spouse who is also a graphic design whiz!
My first thought was to write my name, but “Harold” simply wouldn’t fit in the space I had, even with the strokes only one pixel wide. So a single letter would have to do. In a representation of infinity, perhaps α (alpha) or ω (omega) would have been most apt, but I settled for the more egocentric “H”. (I am, after all, at the core of my own solipsistic universe!) As I’ve said, you’d need to view the original Photoshop file at maximum magnification to see this character. But wait! The plot thickens (or thins)! Things get even crazier.
It occurred to me that although I couldn’t paste in another smaller copy of the image there was nothing to stop me from blowing up a copy of the current large image to make it bigger, and then pasting the current large image into the even larger version.
After the flattening the image with type layer and the layers with the two smaller versions, I duplicated it. Next, I used the SI Pro 2 (Stair Interpolation Pro) Photoshop plugin from Fred Miranda Software to blow the image up. As you may know, there are quite a few Photoshop plugins that automate the process of stepping an image up without appreciable quality degradation; I’ve had good luck with SI Pro.
If you are interested in using the SI Pro 2 plugin, it costs about $25 to download from Fred Miranda Software (you’ll find the link about half way down the page on the left). I’ve used it successfully to upsize images, and also to size images precisely for printing with margin areas on particular paper sizes.
I figured I needed to blow the image up 6X to be able proportionally to fit the 18 doorways into it, for a new total of 24 regressions (I am fondly calling each doorway a “regression”, although of course technically it is no such thing).
After enlarging the duplicate six times, the new dimensions were 15,300 X 22,857 pixels at 300 dpi (or about 51 X 71 inches at 300 dpi). It still looked pretty crisp on my monitor. I was bumping up against a Photoshop limitation, namely a maximum image size of 30,000 X 30,000 pixels, and a maximum Photoshop file size of 2 Gigabytes. I was to find out about the file size limitation when I tried to save a layered version of the large-size image.
And now, a word about my hardware. I noted in an earlier story that it takes quite a bit “under the hood” for me to post-process my images, particularly when complex channel operations are involved. Specifically, I do my image processing these days on a Mac Pro with 2 X 3 Dual-Core Intel Xeon processors (four processors in total), 5 GB of blazingly fast 667 MHz DDR2 RAM, about a terrabyte of SATA disk storage, and a 30 inch Apple Cinema monitor. True, Adobe hasn’t come out yet with a native version of Photoshop, but even in simulation mode this is pretty good hardware.
On the large-sized image, things slowed to less than a crawl. Simple operations, like displaying a histogram, or adjusting a curve, took minutes. While I waited for each operation to complete, I could not only twiddle my thumbs and drink a cup of coffee, I could brew the coffee as well! A good thing I also have my Windows XP machine going for mundane tasks like email, word processing, and blog writing! Here’s to multitasking if saving a file takes half an a hour!
So now I took the 2592 X 3872 pixel image, with the 18 regressions, and pasted it in position as a layer into the 15,300 X 22,857 pixel large version. As I’ve noted, when I tried to archive a version of this image with the layers intact I hit the 2 Gigabyte file size limitation of Photoshop, but fortunately I could work on the image in Photoshop with the layers even if I couldn’t save it, and I just squeaked by just under the 2 GB limit when saving layer-flattened versions.
Besides simply elongating the corridor, an interesting optical effect happened when I combined the images. The doorways start sharp, and gradually lose apparent sharpness as the eye goes down the passage (and the image gets magnified). But at six doorways in, where the pasted original version takes over, the doorways get sharp again. This effect creates an illusion that the passage is even longer than it is, because it doesn’t seem to lose definition as the eye travels down it.
You won’t really be able to see all the doorways in the version on the web. You certainly won’t be able to see the H embedded at the end of the World without End. There simply isn’t enough resolution. To fully see my image, you’ll need to come visit me and look at it on my monitor. You could then inspect the end of the corridor at 1600% magnification and see the H.
Of course, I’d also like to make a print that is close to one-to-one. Alas, my Epson 4800 only goes up to 17 inches wide. There are a number of places around here where I can get my hands on a 9600, with a maximum width of 44 inches. A little smaller than I’d like, the print on a 9600 would end up about 40 X 60 inches. I’ll bet that with a magnifiying glass you could even see the end of the corridor.
How’s that for finding infinity’s end?
Midniteagle
24 Dec 2006I would love to take you up on your offer to see the “H”, and someday I might even do that ! I will have to speak with Phyllis first though.
“Midniteagle”
Pingback: Photoblog 2.0: » Photoblog 2.0 Archive: » Endless Stair
Pingback: Photoblog 2.0: » Photoblog 2.0 Archive: » Is There Light at the End of the Tunnel?
Pingback: Photoblog 2.0: » Photoblog 2.0 Archive: » When Is a Photograph Not a Photograph?
Pingback: Photoblog 2.0: » Photoblog 2.0 Archive: » Far Country
Pingback: Photoblog 2.0: » Photoblog 2.0 Archive: » Cedar Break
Pingback: Photoblog 2.0: » Photoblog 2.0 Archive: » Overpass
Pingback: Photoblog 2.0: » Photoblog 2.0 Archive: » Existential Escalators
Pingback: Photoblog 2.0: » Photoblog 2.0 Archive: » Stadium
Pingback: Photoblog 2.0: » Photoblog 2.0 Archive: » Looking Down
Pingback: Photoblog 2.0: » Photoblog 2.0 Archive: » Vanishing Point
Pingback: Impossible Images | Photoblog 2.0
Pingback: Watchmaker Dial | Photoblog 2.0
Pingback: The Destination Recedes | Photoblog 2.0
Pingback: Old Train Bridge
Pingback: Punch Bowl
Pingback: Workshop in a Suitcase