Photographers often ask me how to get the right exposure with night landscapes. It’s a tricky topic. My experience is that the light meter in my dSLR is pretty much worthless for anything that is dark enough to need an exposure of longer than about 15 seconds at ISO 100. This can be OK for night cityscapes, which typically come in at between 15-30 seconds at ISO 100. But it does mean that the internal light meter is useless in darker landscape situations.
Once exposure times get beyond this city night range, I switch to manual exposure mode, and use the feedback from the camera’s LCD to see how I am doing. The problem with this is that you can’t always tell with night exposures from the LCD whether you’ve exposed properly, or whether you got anything at all. Also, it can be very hard to switch between a bright LCD panel and the almost total darkness of the true night landscape. You want to get your eyes accustomed to the darkness, and checking out the LCD breaks this concentration.

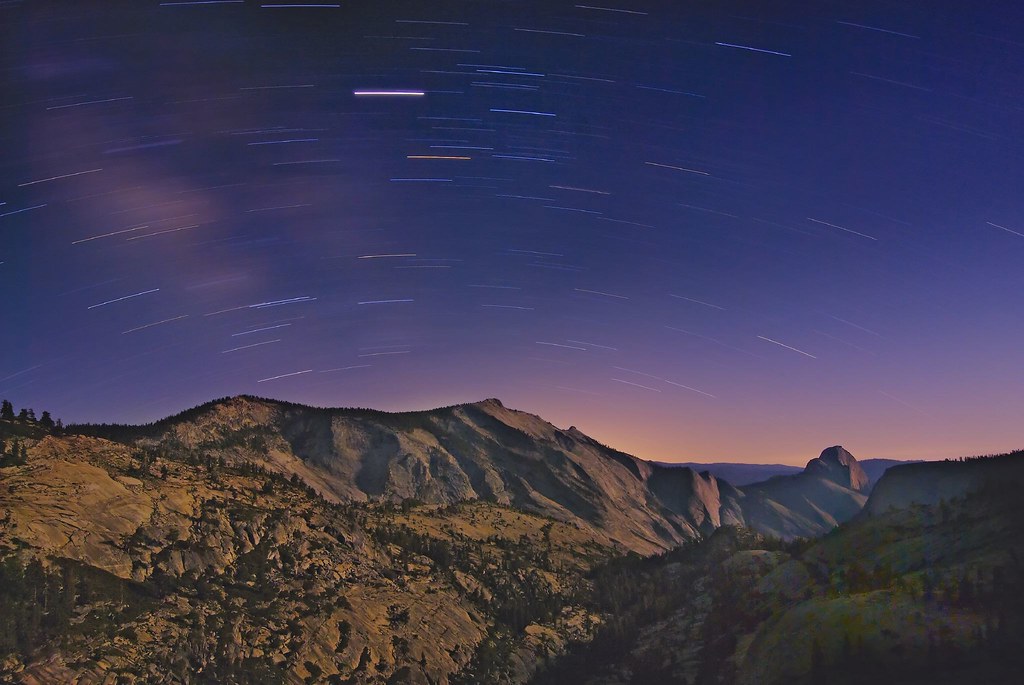
View this image larger. Read the back story featuring this image.
So if the camera’s metering is no help, and the LCD review only partially useful, what gives? The answers tend to be trial and error and experience, but there are some tricks that help.
First, you want to start exposing before it gets completely dark. This gives you a feeling for where the light is trending as the night deepens.
Next, consider how long an exposure you want to make. The difference between longer and shorter exposures at night tends to be the impact on lights in motion (think of stars). For example, an exposure in the 15-30 minute range will render attractive curved star trails, while an exposure of under 3 minutes duration will mostly render stars as pinpoint light sources. (This story has an example of more or less the same scene rendered each way.)
You don’t get many cracks at 15-30 minute exposures, at least not without direct current access. My experience is that a 25 minute exposure, processed for noise reduction, will drain a fully charged battery to nothing (besides taking about 40 minutes in toto).
So the best tactic is to get the exposure right at a high ISO. I find that 3.5 minutes at ISO 640 and f/4 is about right for a night lightscape lit only by starlight. (You might want to do seat-of-the-pants adjustments for light sources other than stars such as the moon, residual sunset, or ambient people light.) If you fire off a shot at ISO 640 and 3.5 minutes and find it is roughly right, you can then calculate the equivalent at ISO 100 by mutliplying the exposure time by 6.4. This gives an exposure time of 22.5 minutes. Plop in a fresh battery, and expose away, with some confidence that your one shot will be close enough (as in the 22.5 minute exposure of Half Dome and Tenaya Canyon with star trails that illustrates this story).