I recently bought a Nikon Close-up Speedlight Remote Kit to try out adding flash capabilities to my macro repertoire.
The kit comes in two versions. The R1, which is what I bought, is intended for dSLRs that already have a flash, such as the D70 or D200. With the R1, the on-board flash serves as the master controller, sometimes called a “commander,” that sets off the two supplied SB-R200 flash units via wireless.
In contrast, the more expensive R1C1 kit is intended for Nikon SLRs that don’t have a built-in flash (such as the D2X). The R1C1 kit essentially adds an independent SU-800 wireless commander unit to the contents of the R1 kit.
Both kits are full of little gizmos, and come in a nice leather case fitted with wonderful little compartments, if you are into that kind of thing (as I am!).
Despite a daunting array of minature components, and instructions that are essentially unreadable, it turns out that there’s not too much involved with basic operation of the close-up speedlight kit–and a great deal involved with sophisticated use of wireless speedlight components.
The basic operation is to mount a ring using the filter screw of one of Nikon’s macro lenses (it’s probably most commonly used with the 105mm macro, but since my 105mm macro is in the shop for repairs I tested it with my wonderful 200mm f/4 macro). You mount the SB-200 flash units on the end of the ring, set each strobe to Group A and Channel 3, and power them up. Next, pop the on-board flash up, and add a dingus to the flash shoe of your D70 or D200 to prevent in on-board flash from misbehaving while it functions as wireless “boss.”
Set the camera to aperture-preferred metering, select an aperture, and you are good to go. Focus–personally I never use auto-focus with my macros, I don’t think it works all that well–and shoot. Whether the aperture you selected lets in enough light depends on (besides the aperture) your distance from the subject, the quantity and positioning of the speedlights, and the ambient light levels. The only real caveat is that at least with my 200mm lens this setup isn’t manageable without a tripod.
Which leads me to a brief digression on why sophisticated use of this kind of setup is complicated. First, you are likely to want to get one or both units off the camera. You can handhold them, or mount them on their cute little stands. In the long run, lighting a macro composition with flash is like lighting a theater: with great control comes great responsibility. If you really want to get into this kind of work, you’ll probably want to acquire a couple of additional SB-R200 units, and likely some “big Daddy” SB-600 and SB-800 units as well.
If you’ve been reading this blog, you’ll know that I’ve been photographing water drops lately. Outdoor photography of water drops with the speedlight kit has one great advantage, and one big disadvantage. The good news is that you don’t have to worry about your subject moving in the wind, the bane of the outdoor macro photographer (since even slight movements are amplified when you get up close). The duration of the flash is the duration of the exposure. However, not only is the flash the duration of the exposure, it is also the light source of your composition (in addition to ambient light, depending on where you set the aperture). This means that those lovely reflections you see in the minature water drop probably won’t be in the flash photo you take–and it is hard to tell in advance what will be there (even the LCD viewer can only give you a general idea with this kind of work).
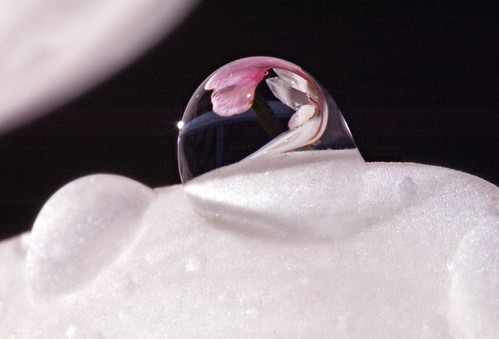
The photo at the top of this story was taken with the R1 speedlight kit, my D70 and 200mmf/4 macro mounted behind a 36mm Kenko extension tube, all on a tripod. One of the SB-200 units was mounted on the ring at the end of the lens, I handheld the other unit off to the left. It’s this second unit that causes the burst of light you see on the water drop. The aperture was set all the way down at f/40 (the camera picks a nominal shutter speed of 1/60 of a second, but the actual exposure duration is that of the flash).
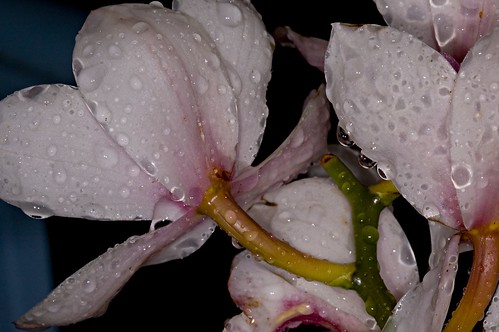
In contrast, this photo of a cymbidium orchid on my front porch was taken the day I got the kit, with both SB-200 units mounted on the front ring in the default position. I took the photo at night, at f/22, and there was essentially no ambient light, which explains the dark image background:
View this photograph larger.
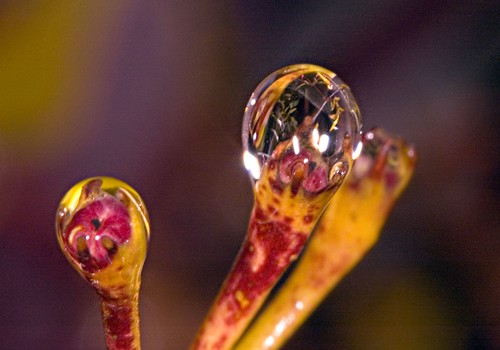
This extreme close-up of a poppy in my garden showing the texture of my poppy was also taken with the straight macro rig.

View this photograph larger.
The poppy close-up that I blogged recently is another example of the impact of mounted both strobes on the front of the lens, and shooting without any other attempt at creative lighting (scroll to the bottom of the story to see the shot created with flash).
The really exciting thing about macro strobe photography is that you can capture subjects in motion. (Hummingbirds, here I come!) This water drop at the end of a twig was blowing around in a high wind. No way I could have captured it with a long exposure:
View this photograph larger.
Pretty soon, at least if you are like me, you’ll want to start fooling around with the elements of the macro speedlight kit to see how you can use them more creatively than the out-of-the box strapped to the end of the lens approach.
This photograph of desert rose quartz was taken in my little macro studio area, with the two speedlights off-camera on their stands, and using colored filters that come with the speedlight kit to cover each flash. One flash, nearer and on the right, was covered with a blue filter. The other unit was positioned back and behind and to the right, and covered with a red filter. You need to note that the photo shows individual grains of sand between the quartz to see how close this image is.
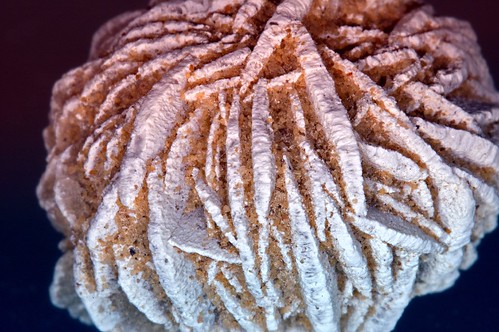
View this photograph larger.
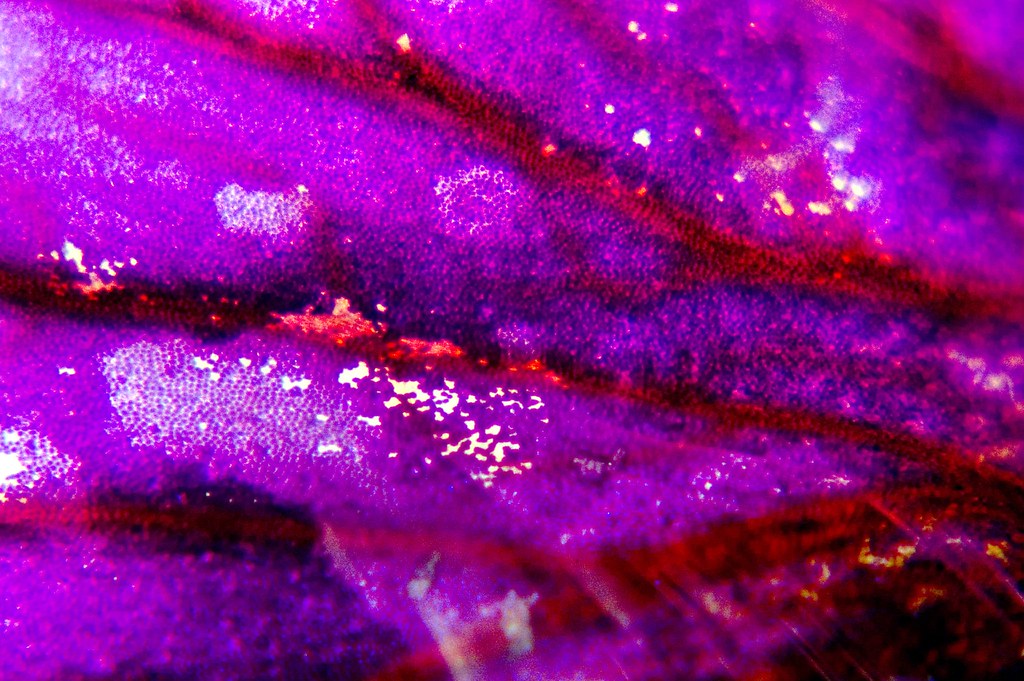
Further along the experimental garden path, with this photo of an iris leaf, I placed the strobe units off-camera beneath the petal. So the photo is lit by ambient light and the light coming through the petal. Probably, an iris petal as never seen before!
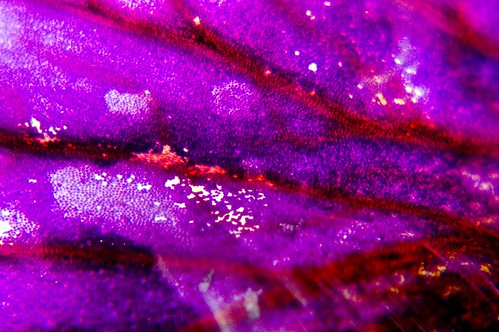
View this photograph larger.
Pingback: Photoblog 2.0: » Photoblog 2.0 Archive: » Poppy Three Ways
Pingback: Photoblog 2.0: » Photoblog 2.0 Archive: » Flowers Cry Too
Pingback: Photoblog 2.0: » Photoblog 2.0 Archive: » The Iris That Bloom in the Spring
Pingback: Photoblog 2.0: » Photoblog 2.0 Archive: » Sunshine in the Gazania Forest
Pingback: Photoblog 2.0: » Photoblog 2.0 Archive: » Love in a Mist
Pingback: Photoblog 2.0: » Photoblog 2.0 Archive: » Columbines with my D200
Pingback: Photoblog 2.0: » Photoblog 2.0 Archive: » Purple Gleam Poppy Popping
Pingback: Photoblog 2.0: » Photoblog 2.0 Archive: » Be the Bee
Pingback: Photoblog 2.0: » Photoblog 2.0 Archive: » More Water Drops
Pingback: Photoblog 2.0: » Photoblog 2.0 Archive: » What is the question?
Pingback: Photoblog 2.0: » Photoblog 2.0 Archive: » Falling Water
Pingback: Photoblog 2.0: » Photoblog 2.0 Archive: » McClamp Bubble
Pingback: Photoblog 2.0: » Photoblog 2.0 Archive: » Photographing Water Drops
Pingback: Macro Tutorials | Nycgraphix BlogPhoto
Pingback: Designcreatology PhotoBlog » Blog Archive » Macro Tutorials
Pingback: Designcreatology PhotoBlog » Blog Archive » Macro Tutorials
Pingback: Macro Tutorials