In a previous post I explained the basics of my workflow for processing a digital image in Photoshop. The first step in this process is to open the image in Photoshop, use the Camera RAW adjustment dialog to process the raw image when it is imported, and save the image off as a PSD file (so you can archive the RAW original).
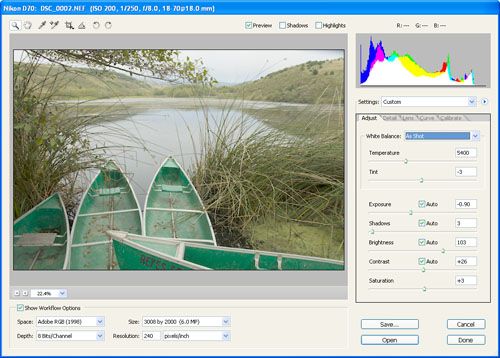
If you haven’t already seen it, take a look at the dialog that opens in Photoshop CS2 when you open a photo saved in Camera RAW format (shown above). It’s a great deal more powerful than the comparable dialog in CS1, and from the viewpoint of digital photographers everywhere this power and flexibility is a Very Good Thing.
Hey – don’t be put off if you haven’t been using your camera’s RAW file format. You should be. For the time being, you can just accept the default / Auto settings in the CS2 dialog, and you’ll get pretty good results — better certainly than shooting in JPEG. It’s fair to say that this window in CS2 is a complex as you need it to be, or as simple. If you are in a hurry, and don’t want to worry too much about tweaking the color balance of your image, as I’ve said, you’ll do pretty well with the Auto and default settings most of the time.
Here are some pointers to help you get started with the wonderful (but complex) RAW Settings files in cs2.
You can open a RAW photo, and get the CS2 RAW Settings dialog to open either from Photoshop itself, or from the Bridge (the new implementation of file browsing in the Photoshop universe).
First, you can save (and open) camera RAW settings. These are the .XMP files you may have seen in the same directories as your RAW images (each one is named the same as a RAW image but with a .Xmp suffix, for example DSC_0001.Nef and DSC_0001.Xmp). These files are written in XML (so you can open them in a text editor and take a look at them) . It’s useful to know about this if you have a number of images from the same batch that you want to treat in the same way.
The title bar of the RAW Settings dialog shows you Exif information for the photo: ISO, lens, and exposure.
Right below the title bar, you have controls that allow you to easily zoom in on an image, crop the image, rotate the image, straighten the image, and take a color sample.
|
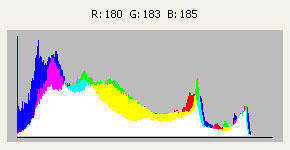
The Histogram, in the upper right of the RAW Settings dialog, and shown to the left, is a visual representation of the spectrum of RGB color values in your photo, and will also show you the exact RGB values for any point in your image (by holding one of the controls over the point). |
The Workflow Options, at the bottom of the RAW Settinsg dialog, lets you set target color space profile, bit depth, pixel dimension, and resolution. (These settings can also be changed once the image is opened in Photoshop.)
To load a previously saved RAW settings to the current photo, click the triangle to the right of the Settings drop-down list (below the histogram), and choose Load Settings from the context menu (browse for an XMP file). You can also use this context menu to save the current settings.
Now for the fun stuff! Most often, if you want to play with anything other then the default and automatic settings, you’ll want to do this with the sliders on the Adjust tab. I’ll discuss the most important of the settings these sliders control below, as well as giving you an idea of what you can do with the four tabs beneath the Adjust tab.

|
The Adjust tab, shown to the left, is used for tonal adjustments to a camera RAW photo. First, you can set the white balance of the photo from the drop-down list of preset white balances. White balance is the setting used to make something white appear neutral (without a color cast) in a given light.
If you leave this to “As Shot,” then the camera’s white balance settings will be used. Otherwise, you can choose from Auto, Daylight, Cloudy, Shadows, Tungsten, Flouresecnt, Flash, and Custom. |
Generally, you’ll find that either As Shot, or Auto does a pretty good job. But depending on the photo, you may want to tweak white balance a bit.
Temperature adjusts the color temperature on the Kelvin scale. The higher the Kelvin number, the “warmer” (more red) the image looks, and the lower the Kelvin number the “cooler” (bluer) the image.
Tint fine-tunes the white balance to compensate for a green or magenta tint. Move the slider to the left (negative values) to add green to the photo; move it to the right (positive values) to add magenta.
If you use the Temperature and Tint sliders to tweak the white balance even slightly, the drop-down white balance setting will change to Custom.
If you check the Auto box for each tonal slider, Photoshop will do its best to find the optimal tonal settings for you. Otherwise use the sliders in order from top to bottom to adjust the image as described:
- Exposure adjusts the brightness or darkness of the image. Move the slider to the left to darken the image; move it to the right to brighten the image. The values are in increments equivalent to f‑stops. An adjustment of +1.00 is similar to widening the aperture one stops. Conversely, an adjustment of –2.0 is similar to reducing the aperture 2 f-stops.
- Shadows specifies which input levels are mapped to black in the final image. Moving the slider to the right increases the areas that are mapped to black. This sometimes creates the impression of increased contrast in the image.
- Brightness adjusts the brightness or darkness of the image, much as the Exposure slider does. However, instead of changing the image in the highlights (areas that are completely white, no detail) or shadows (areas that are completely black, no detail), Brightness compresses the highlights and expands the shadows when you move the slider to the right. In general, you should use the Brightness slider to adjust the overall brightness or darkness after you set the white and black ranges with the Exposure and Shadow sliders.
- Contrast adjusts the midtones in an image. Higher values increase the midtone contrast, and lower values produce an image with less contrast. Generally, you use the Contrast slider to adjust the contrast of the midtones after setting the Exposure, Shadow, and Brightness values.
- Saturation, or color intensity, adjusts the color saturation of the image from –100 (pure monochrome) to +100 (double the saturation). No Auto check box is available for Saturation, so this is something you have to adjust manually depending on how it looks to you.

|
A Camera RAW image as shot has had no sharpening algorithms applied to it. The Details tab is used to adjust sharpness, essentially using the Unsharp Mask filter. You can see the impact of your sharpening on the image that you are opening, provided the Preview box is checked.
The default sharpness is 25%, but can certainly see what a greater percentage will do for your image (it may look surprisingly good). (Of course, you can also apply sharpening once an image is loaded in Photoshop.) |
The two other sliders on the Detail tab are used to reduce noise — the random appearance of pixels that degrade image quality and often appear when images are shot at high ISOs that are analagous to film grain.
The Luminance Smoothing slider reduces grayscale noise, which makes an image look grainy, and the Color Noise Reduction slider reduces chroma noise, which usually shows up as random colored pixels. Moving a slider to zero turns off its noise reduction.
|
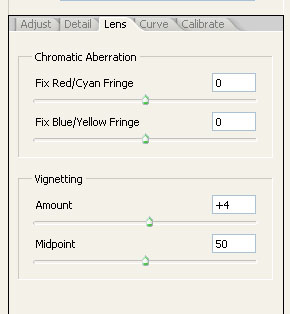
You can use the sliders on the Lens Tab to compensate for chromatic abberation introduced by digital camera lense. One slider is used to compensate for red/cyan color fringing by adjusting the size of the red channel compared to the green channel. The other slider is used to compensate for blue/yellow color fringing by adjusting the size of the blue channel compared to the green channel. |
Vignetting is a defect that causes the edges of photos — particuarly the corners — to be darker than the center of the image. (A common cause is mounting your lens shade incorrectly.)
You can use the vignetting sliders to fix a vignetting flaw — or to add some vignetting as a special effect.
The Amount slider controls how much vignetting there is (how dark it is), and the Midpoint slider controls the size of the area of the overall vignetting.
|
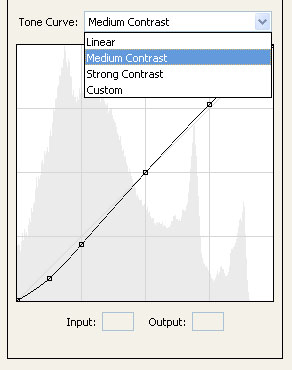
The Tone Curve tab adjusts tonality using a curves adjustment. You can use the Tone Curve menu to choose a preset adjustment. I’ll be writing more about how to use curves to adjust the tonality of an image loaded in Photoshop in a future entry. |
|
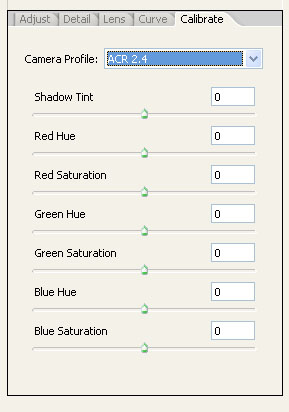
The Calibrate tab lets you correct a color cast in the shadows and adjust non-neutral colors to compensate for the difference between the behavior of your camera and the Photoshop Camera RAW conversion built‑in profile for your camera model.
Sometimes a color cast remains in the shadow areas after you adjust the highlight white balance using the Temperature and Tint sliders. The Calibrate tab has a Shadow Tint slider to correct this remaining shadow color cast. |
In the Calibrate tab, move the Shadow Tint slider to remove the color cast in the shadows. Usually, moving the slider to the left (negative values) adds green to the shadow areas, and moving the slider to the right (positive values) adds magenta.
Here’s a link to an entry showing the finished photo after opening in Photoshop and processing, and saving (as a JPEG) for the web. The settings I used to open this Camera RAW photo into Photoshop were a custom Kelvin temperature of 6050 degrees, Tint +6, Exposure – 1.1, Shadows 17, Brightness 130, Contrast +25, and Saturation +24.
Pingback: Photoblog 2.0: » Photoblog 2.0 Archive: » Processing a Digital Photo
Pingback: Adam Fields (weblog)
Pingback: Photoblog 2.0: » Photoblog 2.0 Archive: » Processing a Photo for Flickr
Pingback: BinaryWolf Blog » Opening Camera RAW in Photoshop CS2 and ACR (Adobe Camera Raw)
Carl Stevens
30 Apr 2006Adobe Camera Raw.
Beware when you start using the Camera raw in Bridge.The default settings straight out of the box place auto on quite a few things and change curves etc.
Underexposed images can look better than they are but you may find an increase in noise in certain areas of you image.
The way around this is to tuen off all the auto settings and other settings that are shipped with Photshop.
Then resave the default settings.
You will then have the raw data as it was taken, then make your adjustments.
Pingback: Photoblog 2.0: » Photoblog 2.0 Archive: » Art As Bartender and the Golden Gate
Pingback: Photoblog 2.0: » Photoblog 2.0 Archive: » Golden Wonder
Pingback: Turning Digital Night to Day
GORDON C WEBB
13 Feb 2024I can’t even find Adobe camera raw for CS2… how do I download and install? Thanks.
Harold Davis
14 Feb 2024Camera RAW is part of Photoshop, so you have it automatically when you install PS. Although it is not clear to me in 2024 why you’d want to run CS2—my post on this subject is from 2005, 19 years ago! LOL.