Meta information: Nikon D70 Raw capture, AF-S VR-Zoom-Nikkor 70-200mm f/2.8G IF-ED at 82mm (appx 123mm 35mm equivalence); handheld using VR (vibration reduction).
Exif: ISO 200, 1/80 second, f/9.
Focus: Automatic, at infinity.
Post: Considerable post-processing in Photoshop; see below.
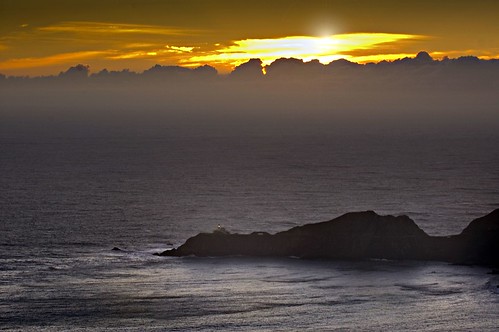
For 150 years the Point Bonita Lighthouse has been helping mariners navigate the recalcitrant currents, dangerous shoals, and incessant clinging fog outside the Golden Gate. This lighthouse marks the entrance to the channel into the San Francisco Bay, and is still in operation.
What I like about this picture is that you can see the lighthouse beacon if you look closely. Once you see the beacon, there’s a moment of sensory adjustment when the scale of the photo–which is of an immense seascape–becomes clear.
I took this picture from the forts of the Marin Headlands the other day when I was clambering around and exploring with Nicky.
The Raw file for the photo was processed three times (once for the ocean, once for the fog and cloud zone, and once for the sky above the clouds) and combined using layer masks and gradients. Essentially, the exposure for each of these three areas was quite different, ranging from the dark ocean to the mid tones of the fog and cloud belt, to a bright sun-filled sky.
I also added a little to the lighthouse beacon with the Clone Tool, added a flare to the sun with the Lens Flare Filter, and used a dark blue gradient overlay used to enhance the sky.
The last step was to perform routine level adjustments and sharpening.
Pingback: Photoblog 2.0: » Photoblog 2.0 Archive: » Ocean Sunset
Pingback: Photoblog 2.0: » Photoblog 2.0 Archive: » Farallon Islands
Pingback: Photoblog 2.0: » Photoblog 2.0 Archive: » Fog-Bound Shore Not
Pingback: Photoblog 2.0: » Photoblog 2.0 Archive: » Pirate’s Cove and Marin Headlands
Pingback: Photoblog 2.0: » Photoblog 2.0 Archive: » Golden Gate Moonscape
Pingback: Photoblog 2.0: » Photoblog 2.0 Archive: » Golden Gate from Point Bonita