Late in the afternoon of a bright autumn day I arrived in Yosemite Valley. The valley was already in shadow, with only the tops of the surrounding cliffs lit by the sun. I stopped along the banks of the Merced River. With my camera on my tripod, I snapped five exposures of the scene, all at the same aperture (f/7.1). My exposure time varied from 1/15 of a second to 1/125 of a second.
The longer exposures captured the details in the shadows, but blew out the highlights on the cliff tops and the sky, while the shorter exposures rendered the sky acceptably, but lost all nuances in the reflections in the river to darkness. My plan was to combine the exposures to create one image with the best characteristics of each individual exposure.
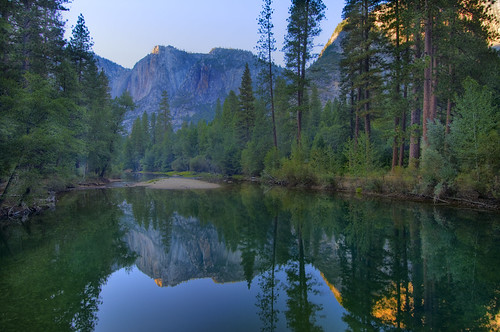
Yosemite Afternoon, photo by Harold Davis. View this image larger.
HDR
Combining multiple captures to create an image with an exposure range beyond that possible in a single capture is known as High Dynamic Range imaging, or HDR for short. The trick is to compress the extended range into a single image that is pleasing, will display on a monitor, and is reproducible. Note that the exposure latitude within a single RAW capture also gives rise to the possibility of using HDR techniques using different versions of the one RAW file as the input, a technique that I’ve dubbed multi-RAW processing.
Hand HDR
Whether combining different exposures, or different versions processed from a single exposure—or even both these techniques at once—my approach has been to work in Photoshop to use layers, masking, the Gradient tool, and the Paintbrush tool to combine the variants. You can see an example of the results of this hand-crafted approach to HDR in the six-exposure blend that I used to create Yosemite Morning, taken the day after I shot the series used to create the Yosemite image that accompanies this story.
I’ll be writing more about the details of my hand HDR process in an upcoming book—I also teach the technique in workshops—but for now let me mention some downsides: it is labor intensive, time consuming, can look funny if the layers aren’t masked very carefully, and can be close to impossible to achieve in areas that involve complex interconnected details in mixed light.
Photomatix
Since we live in an age that tends to want instant results, most people try experimenting with software the does the HDR for them. I’m no exception, but I’ve been unimpressed with Photoshop’s HDR automation.
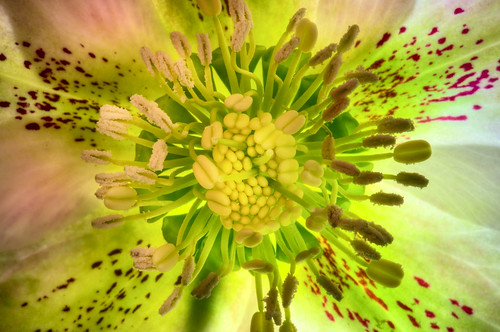
So I was excited recently to get to play with Photomatix, which is probably the leading HDR software. The Yosemite image above, and the floral close-up below were both created in part with Photomatix. As you’ll see, the words *in part* are crucial to understanding Photomatix’s place in my scheme of things.
View this image larger.
With Photomatix, HDR generation is a two-step process. You open the images in Photomatix, and the software generates an HDR composite. Then, in a process called “tone mapping”, you tweak the settings used in the mathematical algorithms that reduce the tonal range in the combined image in order to generate a single attractive and reproducible version.
Workflow
As a practical matter, I found Photomatix’s rendering of my RAW files unacceptable. So my workflow went like this: I opened the set of images in the Adobe Camera RAW plugin, applying the same settings to each (experimenting with different RAW conversion settings on each file included is also possible, of course, although it adds more variables and complexity). I opened the files that resulted from these conversions in Photoshop, and saved them in the TIFF format (because Photomatix doesn’t read native Photoshop PSD files).
Next, I opened the TIFF files in Photomatix and generated the HDR composite. As the documentation warns, the HDR image doesn’t start out looking too good, so I worked to tone map it for more attractive characteristics. When I was satisified that the image was the best it could be, I saved it as another TIFF file.
Combined Approach
Some parts of the resulting HDR image were pretty wonderful (for example, the trees on the right). Others, not so good (the sky had a burnt, burnished quality, and the water was murky). I ended up layering-in versions in Photoshop to fix portions of the Photomatix generated image (the same general remarks are true of the floral image that also accompanies this story).
If my workflow with Photomatix sounds like a lot of work, you are right, it was. Then again, I’m happy to work if it helps my work (if you catch my drift).
Life is simpler but less rich
Also, my life would have been simpler in Photomatx if I’d shot in-camera JPEGs. The truth is that the markets for my work often require extremely high resolution, and JPEGs just won’t do. I’m almost never happy with JPEGs compared to my results when I do the RAW conversion.
Conclusion
Paradoxically, I’m left with an appreciation both for what Photomatix can do with HDR, and for the limitations of the software. I’m sure I’ll be using this software to process some portions of my imagery, just as I’m sure that my final versions will require hand work and layer masking with other versions of the files.
If you are an image creator who cares about your craft, the limitations in HDR software amounts to a good reason to learn hand HDR—combining many different versions shot at different exposure times, and processed individually from hand-tweaked RAW conversions, using layer masking—even if you expect to primarily be using automated HDR programs like Photomatix.
Harold Davis
19 Feb 2009For some eye-popping and stunning HDR imagery, and a very different take on HDR than mine, check out Trey Radcliffe’s work.
Pingback: Isopogon Formosus | Photoblog 2.0
Pingback: Mirror Lake | Photoblog 2.0
Pingback: Flash Dance | Photoblog 2.0
Pingback: Tunnel View | Photoblog 2.0
Pingback: Cienfeugos Sunset | Photoblog 2.0
Pingback: Reflections from Stoneman Bridge | Photoblog 2.0
Pingback: First Look: HDR Efex Pro | Photoblog 2.0