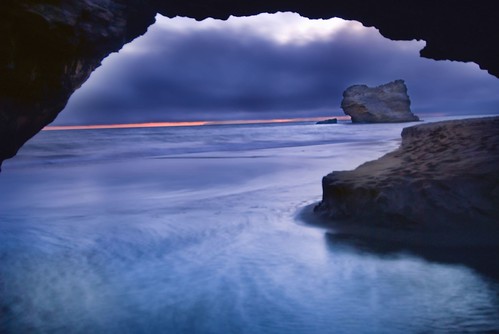
Mark and I went back out to Arch Rock last night. It was a little earlier than my last hike out there, so I was able to work my way down the little canyon and across a couple of rock faces to the beach, where I photographed the arch in Arch Rock in the gathering dusk. Of course, I also photographed the moon on the beach, and other aspects of this grand scene. On our way back through the long foot-pounding miles of the tunnel of a trail under the dark trees we talked about RAW captures, white balance, and landscape photography.
View this image larger.
It’s well known that one of RAW capture’s great virtues is the ability to correct exposure in post-processing. Within each RAW capture there’s a theoretical eight f-stop range of possible exposures that can be processed out of the raw data (if you excuse the pun). Processing at the limits of this range does introduce problems, such as excess noise, into an image. But still, the potential exposures inherent within each RAW capture do give opportunities for correcting poor initial exposures, and for extending the dynamic range of images. An example of extended dynamic range means to be able to see detail in shadow areas that would normally be black in an image exposed for bright sunshine.
That said, it’s best practice not to presume on the kindness of RAW. You should expose each image in-camera as accurately as possible. This avoids potential problems and gives you more options when you do post-process the RAW.
Even when a photo of mine was exposed properly in the first place, like the image above at ISO 100, 2.5 seconds, and f/4, I almost always end up combining from three to five different versions of the RAW capture using Photoshop layers, masking, and layer blending modes. The 2.5 second time exposure accounts for the soft effect in the clouds and water.
White balance refers to the color temperature of the light used in a photograph. It is measured in Kelvin degrees. The photograph above is lit by a combination of ambient sunlight (generally 5200 degrees Kelvin, but a little warmer in the photo of the arch because the sun was setting, so maybe 5800 degrees), and moonlight (roughly 4300 degrees Kelvin).
You can measure the color temperature of light under controlled circumstances, for example, in a photography studio. If you’ve measured the temperature of the light, you can dial it into your camera. In theory, this leads to an accurate color rendition of your subject.
As a practical matter, it is pretty impossible to measure light temperature in field conditions like I encountered in the photo of the arch. Not only did I have to do a bit of the mountain goat thing to even get in range for the photo, I also had only a short amount of time to make my exposure before I lost the light.
So the best practice is to leave White Balance set to Automatic. This means that your camera will make some attempt to measure the light temperature, and associate this reading with the image. But associating a White Balance measurement with a RAW image doesn’t actually change the image data itself because the White Balance data is simply set in a tagged text file associated with the RAW file. You can change the White Balance to any Kelvin number you think is appropriate when you convert the image in post-processing. You can do this using a slider, and visually inspect the impact of the change on your photo.
If you really want to get tricky, you can process different versions of a single RAW capture using different white balances. For example, I processed the water within the arch at 4300 degrees Kelvin (moonlight) and the clouds at 5800 degrees Kelvin (sunset).
As with differing exposure values from a single RAW capture, versions from a single RAW capture that use different white balances are combined in Photoshop as layers using masking and your choice of blending mode.
Mike the Snow
9 Jul 2007Thanks for the RAW info. Very, very helpful.
Reto Hadorn
4 Jan 2010This is a very late reaction on this blog entry. I came across it while looking for white balacing strategies in digital photography of landscape.
My stance is that even if you get a measure of the light characteristics with a grey card, you still have to decide whether you want to correct for the color cast at the time, to correct it halfway or even to exagerate it…
You write: “For example, I processed the water within the arch at 4300 degrees Kelvin (moonlight) and the clouds at 5800 degrees Kelvin (sunset).” Are those numbers your guess for the real color temperatures or values selected in order to enhance the color contrast in the picture?
Harold Davis
4 Jan 2010Reto – I agree with your comment. The numbers are those in the ACR slider based on my desire to enhance the colors in the photo. If desired, the verb “enhance” can be read to make the photo “more like the scene was” or “more like the scene made be felt”—but I don’t feel the need for post-hoc rationalizations for creating images my way. Best wishes – Harold
Reto Hadorn
4 Jan 2010I am glad that you got my point. Your answer helps.
I understand your approach. For you, it would be to rationalize if you would think about the meaning of those numbers; where I stand now, it is more the search for a proactive methodology for thinking about colors and for settling my own way.
Unfortunately, most authors writing about color think they have done it when they have exposed the color management concept. To me, the real thing starts beyond color management, once you have a coherent system.
I see that you did publish several well illustrated ‘how to’ books. I am sure that a book on color tastes and procedures would be a great success – provided you show several ways.
Reto