
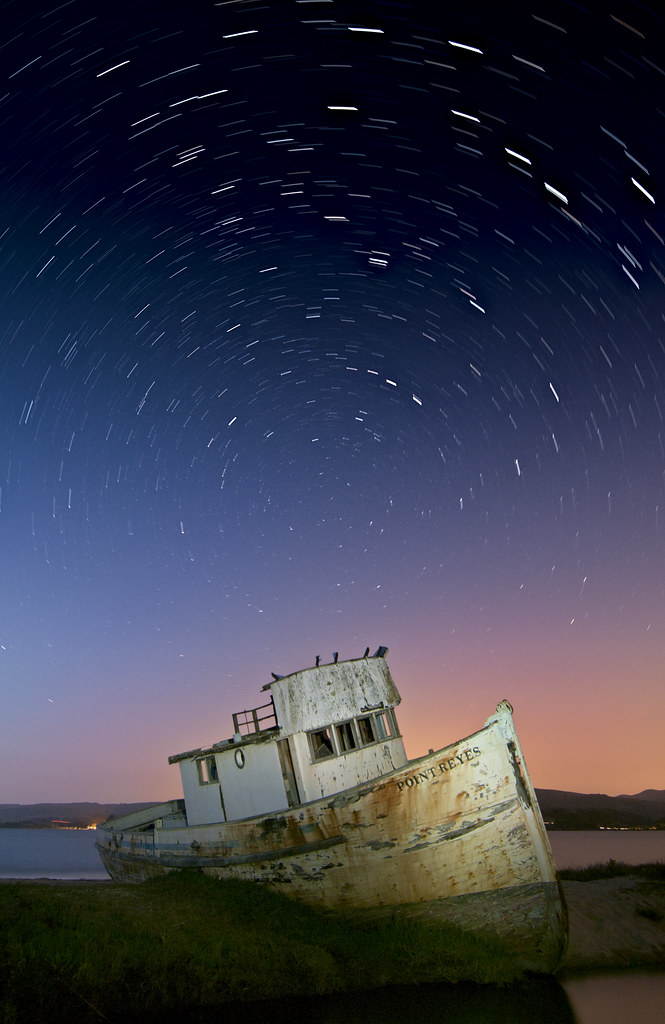
Faking Star Trails, photo by Harold Davis. View this image larger.
I faked these star trails. Meaning that this image is not based on an exposure, or combined composites of exposures, long enough to produce the star trails shown. The simulated star trails are an effect created in Photoshop from a single, relatively short exposure.
Ron Larsen, who attended one of my night photography workshops, pointed me to the Star Trails action in Photoshop CS5 Standard Edition. This action takes a single, static shot that includes stars at night and adds apparent motion to the stars in the form of trails. The best demonstration is given by Russell Brown in a video part way down this page of his Photoshop CS5 tips. The action works by successively copying and rotating the base layer of the photo, then compositing the stack of rotated layers together.
There are some gotchas to using this action. First, it just ain’t natural—meaning this is merely a mechanical rotation rather than the real astronomical movement of the stars. More on this point later, but the simulation works pretty well if your camera is pointed due north, where the movement of the stars is pretty much curved around Polaris (the North Star). In other words, pointing due north the simple curvature model is pretty close to reality; however, in other directions this simple model fails fairly drastically.
Another issue is that the stars in the photo need to be rendered as points. If the stars show motion by being elongated as trails before applying the action, then the action will create trapezoidal shapes in the sky, because the entire length of the original star trail is being reproduced in two-dimensions.
This probably implies an exposure time of three minutes or less, possible at dusk before deep night comes on, or when the night is dark by substantially boostin the ISO. Both approaches have issues—a higher ISO implies more noise, and a star shot at twilight means that the easy layer blending the Mr. Russell Brown shows in his video is not really possible (the Screen blending mode only works in his cute example because of the near-Black background color of the sky).
But qvetching aside, it is possible to get some attractive images using the Star Trail action. For example, I’m pretty pleased with the image shown at the top of this story. If you are interested, it was created from this three minute exposure I made a couple of years back. Blending of the foreground and the “faked” star trails layer was done using a layer mask and a gradient, along with some hand painting on the layer mask.
I’m pretty pleased with the way the fake star trails came out, but it does lead to a moral question, or, dare I say it, a question of moral hazard. To get “actual” trails as long as the ones shown here would have taken somewhere between 20 and 40 minutes of exposure time and a great deal of patience. It doesn’t seem fair to be able to get attractive results without the same amount of effort.
Here I am somewhat hoisted on my own petard. I’ve declared a number of times that images should be judged on how they come out, not the technique used to create them.
It’s my considered opinion that work done in Photoshop is just as valid as work created solely in-camera. Following this logic, though purists may not agree, I have to conclude there is a place for faking star trails—although the technique has to be done with care so that it isn’t obvious. And nothing will replace the feeling of shooting through the night and coming home with a perfect composite for stacking of the stars wheeling through the heavens on their journey through the night!
Update: It turns out that there are several ways to tell fake star trails from the real thing:
- Steven Christenson points out that what the Photoshop action does is to circle around the center of the image. Only if one exactly centered the exposure on the north celestial pole and then used the action would you get something that would be correct for a perfectly rectilinear lens. You can easily see if you compare my fake star trail image with the original on which it is based on that the stars are circling around the image center rather than north.
- A close-up examination of the fake star trails at high resolution shows they are formed differently from actual stacked composite star exposures. The fake trails are not curvilinear: there is a chunky looking step-out at the pixel level representing the duplication and changed position of successive layers created by the action.
For more on stacking—the real thing—check out my blog stories Star Trails over Drakes Bay and Stacking Star Trails. You’ll find complete instructions for making photos of star trails, and how to use an interval timer, in my book Creative Night: Digital Photography Tips & Techniques.
Steven Christenson
16 Jul 2010The CS5 action is not the only way to fake star trails. Tabaware makes a tool called Star Tracer to do it too. The primary purpose of Tabaware’s tool is to fill in the gaps that sometimes occur when stacking shots… but it can be used to cheat, too. It is quite different from CS5 in that you interact with the tool to define the path of the stars and it then uses that information to complete the arcs… and not just circular, but also convex and concave. I certainly do not encourage people to fake work that is more properly done with care and planning, but I did find the tool handy to fix a “gappy” trail that I took in the Sierras. The tool is available in Windows only, just like Image Stacker (also by Tabaware), and Startrails.exe.