
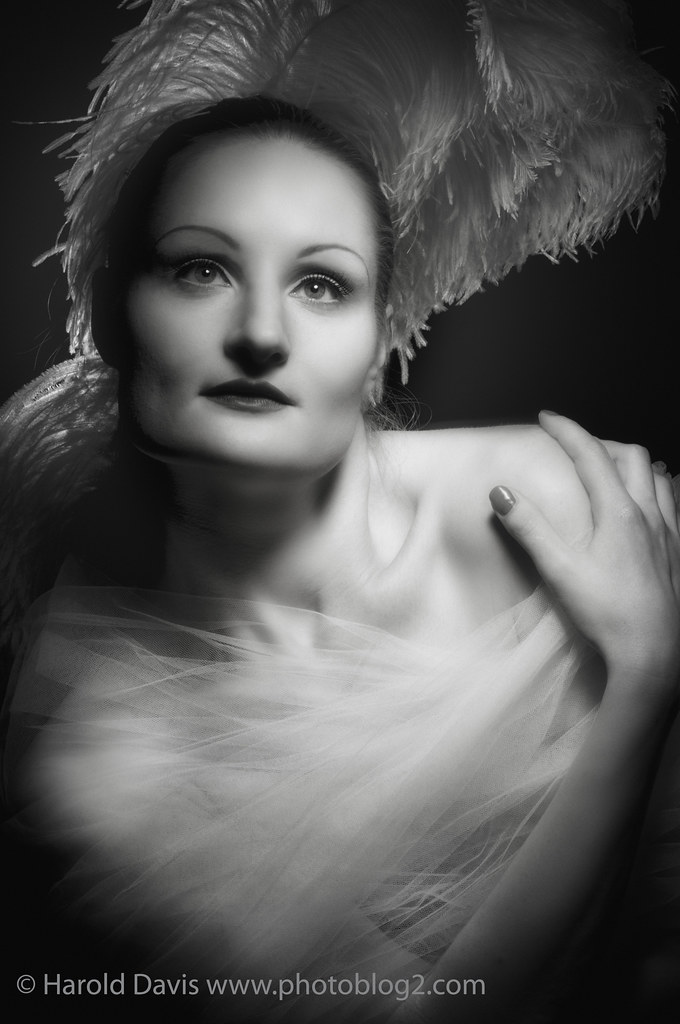
Hurrrell Lighting, photo by Harold Davis. View this image larger.
Martha Blanchfield of Renegade Photo Shoots organized a most excellent workshop on Hurrell lighting. Led by photographer Rafael Hernandez, the goal was to use modern studio lighting, digital cameras, and post-processing to simulate the look of classic Hollywood glamour photographer George Hurrell.
There were three models, a make-up artist, and some propping in keeping with the glamour theme. But the main emphasis was lighting, and digital simulation of the effects that Hurrell achieved the natural way.
Hurrell is probably most famous for his work in the 1930s. He made contact prints directly from 8X10 film shot in a view camera, typically at fairly slow shutter speeds (so the models had to be posed to keep still during the exposure process). The orthochromatic film available led to unrealistic renditions of colors; lips and cheeks tended to go dark. Uncoated lenses produced halo effects, and the film stock added halation, increased glow on the highlights. Film was underexposed and overdeveloped, leading to dramatic high contrasts between lights and darks, and much retouching (which was done directly on the 8X10 film, very carefully, by the legions of retouchers employed by the movie studios).
Essentially, harsh lighting and high-contrast development were balanced by soft lenses and extensive retouching.
These technical considerations led to what might be considered flawed results by modern standards. Certainly, Hurrell portraits are a far cry from the smooth glamour images of today. But Hurrell produced images that are dramatic and extraordinary. It’s interesting to speculate whether his success was in spite of, or because of, the technical constraints placed on Hurrell.
While chief portraitist at Paramount Studios, Hurrell helped develop the “butterfly” portrait lighting style (sometimes called “Paramount” lighting). Basically, a key light was placed above and directly in front of the model’s face.
The term “butterfly” refers to the shadow made by the model’s nose. As a matter of fact, dealing with the nose shadow is one of the key issues in any kind of portraiture with direct lighting pointed at the face. Hurrell’s approach was to position the model for an attractive butterfly shadow. Emulating this requires close coordination between camera position and the model: a little bit in one direction and the shadow becomes large and ugly, and a little to far in the other direction and your lens is looking up the model’s nostrils.
I shot the model above using my 100mm Zeiss lens, essentially a movie optic, and great for portraiture. Of course, it is much sharper than the uncoated lenses that Hurrell used, so I softened the image in Photoshop using a Gaussian blur, and also applied the Nik Glamour Glow filter.
Simulated Hurrell black and white tones and contrast were achieved by combining a High Contrast Red preset Black & White adjustment layer with the Nik Silver Efex Antique Plate 1 filter. You can find more about my monochromatic conversion techniques in Creative Black & White: Digital Tips & Techniques.
FrancisK
6 Apr 2010I liked this article a lot and I enjoyed looking at the example posted.
I have your PS Darkroom Book which I have found most interesting and I am beginning to apply some of the techniques.
I do enjoy the blogs – I might have said it before but I do like the way you continue to experiment with different techniques and are willing to share the information with your readers.
darkman
6 Apr 2010When it comes to Hurrell and people trying to recreate his style, I can be a bit harsh so bear with me. First off, your lighting isn’t Hurrell at all. It may look similar, but you shop too much. You are a digital artist not a photographer. Try getting it right in the camera FIRST. Then retouch. The orthochromatic film was only used by Hurrell for a short period of time before newer better film was introduced and he switched to that.
The “Harsh” lights were harsh yet soft at the same time. if you don’t understand fresnel lighting or lights you wouldn’t understand it at all.
The dramatic lighting and contrasts weren’t achieved after the picture was shot it was done in camera with lighting, the only reason to retouch was to perfect the person in the image, not make the image for contrasted or dramatic, that came with the lighting. the retouching was to remove freckles or blemished and wrinkles.
Your picture is nice but it is too shopped and looks shopped, way shopped. If your going to try to be good at this, don’t use Gaussian blur use a shallow depth of field, or a softened lens. Gaussian blur looks like a gaussian blur.
You just can’t get the same look with strobes, and software, you will never get the good clean lines of eye lashes with a softbox and strobe.
I use three things to retouch my photos, both digital and film: Noise Ninja to do *some* Smoothing, Healing brush to remove blemished, freckles and pimples, and sometimes unsharp mask for sharpening. That’s all you really need if you do it right, in the camera. I do some color adjustments for color shots, but the black and white shots are shot in camera and slightly retouched in photoshop, not overly retouched.
I’m not perfect either but I have Studied Hurrell and his lighting for a few years now and this is what I am known for, I just spent the day with His Last Assistant in Hollywood in December and will be putting up a post and video and images about that in the next two weeks, look for it….
Nice picture, keep it up.
Darkman
http://www.darkmansdarkroom.com